The Ultimate Guide of Validating JWT With Kong
Introduction
JSON Web Tokens (JWTs) have become integral in the world of web development, serving as carriers of vital information across systems. In the quest to ensure the authenticity of requests, the validation of JWT tokens becomes a crucial step. Simultaneously, API gateways like Kong hold a pivotal role in an organization’s API architecture, particularly in the rapidly advancing adoption of Oauth 2.0 and OIDC standards. In this blog post, we’ll delve into the tools available for validating JWTs with Kong, exploring the critical components of this process in today’s dynamic web development landscape.
What is JWT
Feel free to skip and jump to the next section to learn which plugin you should be using if you are already familiar with JWT.
JSON Web Token (JWT) is an abstract that is represented in the form of JSON Web Signature (JWS) and JSON Web Encryption (JWE). To keep this post concise, when we refer to JWTs here, we are primarily focusing on JWS. If you are interested in knowing validating JWE, please check this post.
According to RFC7515 JSON Web Signature (JWS) represents content secured with digital signatures or Message Authentication Codes (MACs) using JSON-based data structures.. In more straightforward terms, picture it as a letter containing a crucial message, and this message carries the signature of a specific individual. To guarantee the letter’s authenticity, we must validate that signature.
Algorithm
Cryptographic algorithms and identifiers for use with JWS are described in the separate JSON Web Algorithms (JWA) JWA specification and an IANA registry defined by that specification.
The cryptographic algorithms and identifiers intended for use with JWS are outlined in the distinct JSON Web Algorithms (JWA) JWA specification.
Typically, it is recommended to employ asymmetric algorithms such as RS256 or ES256. The use of symmetric algorithms like HS256 is discouraged.
Structure
Let’s take a look at JWTs structure first. Here is an example:
JOSE header
JOSE header normally tells the recipient the hashing algorithm (alg) and key id (kid) that are used to secure this JWS. It is also very common to see type (typ).1
2
3
4{
"alg": "ES256",
"kid": "huHA7D5ZMCJMhKiRHeX0hfRXo__UAlJBgAdN8qoC01w"
}Payload
Payload is the message to be secured and passed to the other party.1
2
3
4
5
6
7{
"iss": "fomm",
"aud": "jwt-demo",
"sub": "demo-user",
"iat": 1672403378,
"exp": 1672403678
}Signature
Users need to compute signature of protected header and payload using algorithm defined in JOSE header and make sure signature matches.
Generate JWT
Given the popularity of JWT, there’s libraries for different languages at your disposal. If you’re utilizing OIDC providers such as Keycloak or Azure, they will automatically generate JWT tokens for you. In this section, we will demonstrate how to create JWTs using jwt-cli and Python jwcrypto library.
Generate RSA Key pair
Let me use openssl to generate RSA private key for signing our tokens and export its public key for validation.
1 | openssl genpkey \ |
JWT CLI
If you have nix install, you can use
nix shell nixpkgs#jwt-clito use it. Otherwise please refer to official git repo.
kid
According to RFC 7415 section 4.1.4, The structure of the kid value is unspecified. Its value MUST be a case-sensitive string. Use of this Header Parameter is OPTIONAL. Although it is optional, in most cases you would want to include kid in the JOSE Header, this helps the recipient to identify which public key from your JWK can be used to validate the token.
I will use a tool to generate kid so it can be linked back to this specific public key.
1 | cat rsa-public.pem \ |
JWT
Now we can generate JWT as below with a simple payload.
1 | jwt encode \ |
Validate JWT
Because we use RSA private key to sign our token, we need to use its PUBLIC KEY to validate. With jwt-cli, we can validate with below command.
1 | jwt decode --secret @rsa-public.pem --alg RS256 <JWT> |
Python
Environment
You can install it with pip pip install PyJWT. I prefer to use nix develop. Assuming you have nix install you can save below to flake.nix. Then you can run nix develop -c $SHELL to get the environment set up.
1 | { |
JWT
Now let’s save below to jwt.py and we should be able to run python jwt.py to create a token.
1 | from jwcrypto import jwk, jwt |
Validate JWT
Validation with jwcrypto library is pretty straight forward. Here is a sample you can use.
1 | from jwcrypto import jwk, jwt |
You can save the content to jwt-validate.py, run it and follow the prompt to provide your JWT.
Which Plugin should you use?
There are 3 official plugins are available for JWT validation.
- JWT plugin
- JWT signer plugin (Enterprise)
- OpenID Connect aka OIDC plugin (Enterprise)
If you do not have an Enterprise license, your can only use the open-source JWT plugin. To implement this plugin, you’ll need to create individual jwt_secrets for each consumer. In cases where you need to associate the same RSA public key with different consumers, ensure that the key value in all jwt_secrets is unique. You can check out my blog post on this plugin here.
If you have access to all three plugins, here are the questions to consider:
How do you generate JWTs?
- If you rely on an IDP to generate tokens, it is better to use OIDC and JWT Signer.
Do you need to validate JWTs from multiple IDPs?
- OIDC Plugin supports fetching and auto rotate public keys from multiple JWKs and use these keys for JWT validation.
Do you have network restriction on the upstream API services that do not have internet access?
- You can use the JWT Signer plugin to re-sign tokens and your upstream servers only need to trust Kong’s public key, eliminating the need to fetching IDPs JWKs.
Do you need to validate JWT claims?
- If scope validation is necessary, OIDC is the preferred choice. It supports the validation of up to four claims simultaneously.
Do you need to read token claim and then pass it to upstream or downstream header?
- If this need arises, you must use OIDC plugin.
Do you need to validate two token issued by different IDPs at the same time?
- In the event your API consumers need to validate their requests with two tokens, such as an access token and a channel token, the JWT Signer plugin should be your selection.
Do you need Group mapping for access control?
- All three plugins allow for consumer mapping. However, if you wish to manage developers on IDPs, you can use the OIDC plugin to create virtual credentials based on the token claims. These virtual credentials can be utilized for rate limiting and access control.
If you’re still unsure about which plugin to choose, my recommendation is to start with OIDC. It’s Kong’s most complex authentication plugin, but it provides a wealth of additional features compared to the other two, including key rotation rediscovery, virtual credentials, scope validation, and more.
You might be wondering, “Considering your high praise for the OIDC plugin, can I still use it if I don’t use any OpenID Connect provider?” The answer is yes, and I’ll guide you through the process.
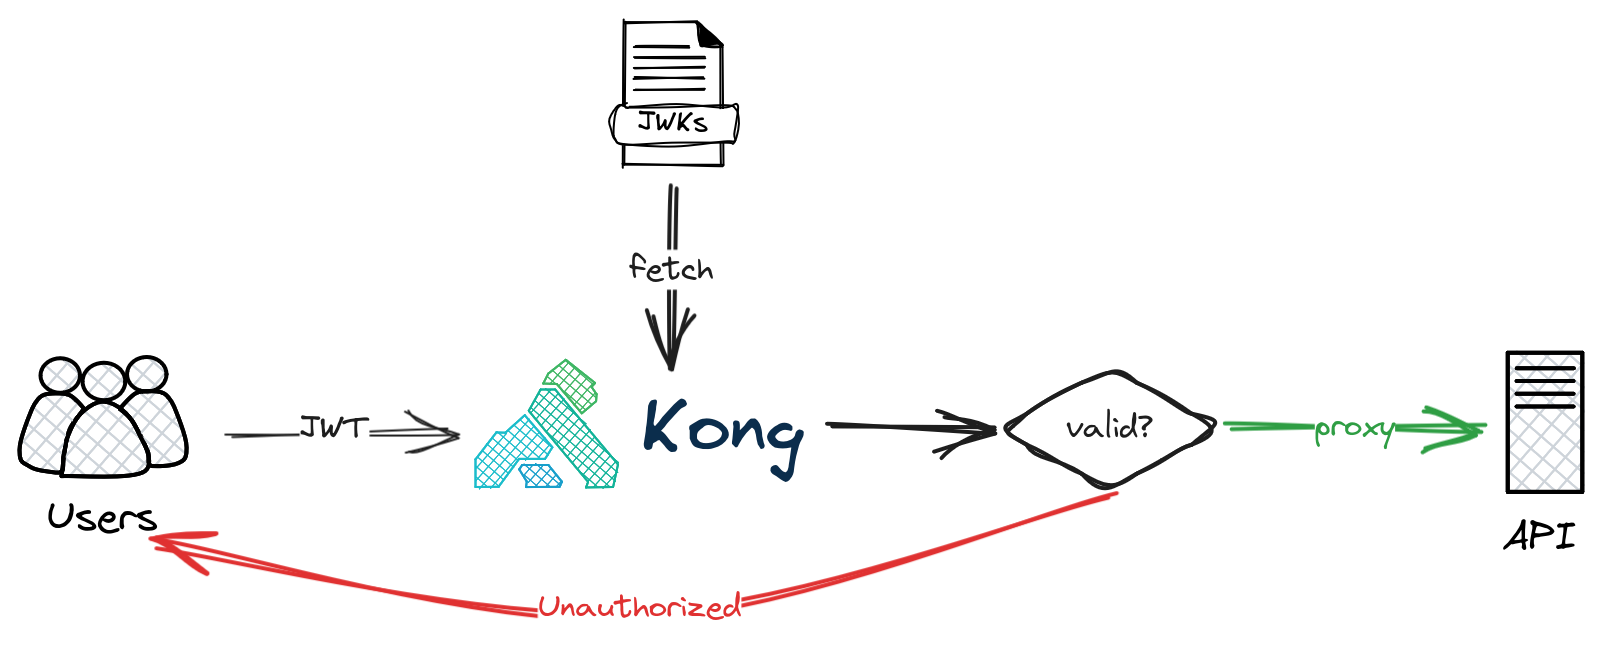
OIDC JWT validation
The way it work is really quite simple. The OIDC plugin is responsible of fetching JWKs, these public keys will be stored in cached and used to validate JWTs. When IDC rotates their keys and sign tokens using new keys, OIDC plugin will re-discovery the public keys from JWK endpoints. You can check which public keys Kong has by visiting <admin_api>/openid-connect/issuers endpoint if you have access to Admin API
JWT signer works similarly except it can only fetch JWKs from one URL and it also re-sign the token. Check out this blog post to learn more about JWT signer plugin.
Generate JWKs
We use danedmunds/pem-to-jwk docker image to generate the public key JWK.
1 | cat rsa-public.pem \ |
Create docker network
We will run our containers in the same docker network kong-net.
1 | docker network create kong-net |
Host JWKs
Next I will use a json-server to host these keys.
1 | docker run --rm \ |
Start Kong EE
As usual, I will deploy Kong in the DBless mode for our demo. Assuming you have a valid kong enterprise license and it is stored in environment variable KONG_LICENSE_DATA. We can start Kong Enterprise 3.5 in dbless mode with below command.
1 | docker run --rm --detach --name kong \ |
Prepare Kong config
Let’s save below config to /tmp/kong.yaml.
1 | _format_version: "3.0" |
Here is what I do with above config.
- I use request termination plugin as upstream to return 200 response and echo back the request.
- I make sure all my JWKs under
config.extra_jwks_urisso the OIDC plugin can fetch the keys. - All issuers (my python and jwt-cli commands) are listed under
config.issuers_allowed. OIDC plugin validates issuers by default.
Then we can push this file to kong at /config endpoint.
1 | curl --request POST \ |
Validate JWT
Now we have everything ready, let’s test our setup. You can follow above steps to generate a JWT first. For a quick reference, below command store the JWT in token variable.
1 | cat rsa-public.pem \ |
Next we can call our endpoint with this token as authorization bearer token and we should get a 200 response.
1 | curl --request GET -i \ |
That’s all I want to share with you today, hopefully it helps you to choose the right plugin.
See you next time