How to Use Flux to Manage Kubernetes Declaratively
Introduction
In the era of cloud-native computing, where containerization has redefined the way we architect and deploy applications, the significance of disaster recovery has surged to new heights. The ephemeral nature of containers and the dynamic orchestration of Kubernetes have intensified the need for meticulous disaster recovery strategies. Simultaneously, this cloud-native paradigm, amplified by seamless CI/CD pipelines, has made the dream of managing applications declaratively a reality. The marriage of containerization and Kubernetes empowers us to encapsulate entire application ecosystems into portable, reproducible units, enabling us to define and control their desired state with unprecedented precision, and thus, steering us towards a future where resilience and declarative management harmoniously coexist.
While users leverage manifest YAML files to declare the desired state of their software, the process of applying and managing that software, particularly when utilizing tools like Helm, still largely involves manual intervention.
In this article, I aim to present the approach I employ for the declarative management of my home lab cluster using FluxCD. I will delve into the intricacies of designing the folder structure, delineate the functions of each directory, and elucidate the process of installing or uninstalling software within my cluster. Once the underlying mechanics of this framework are understood, seamlessly integrating specific units into distinct folders becomes a straightforward task. This empowers you to effortlessly introduce or remove applications through a solitary Git commit, leaving the subsequent orchestration and management tasks in the capable hands of FluxCD.
Folder structure
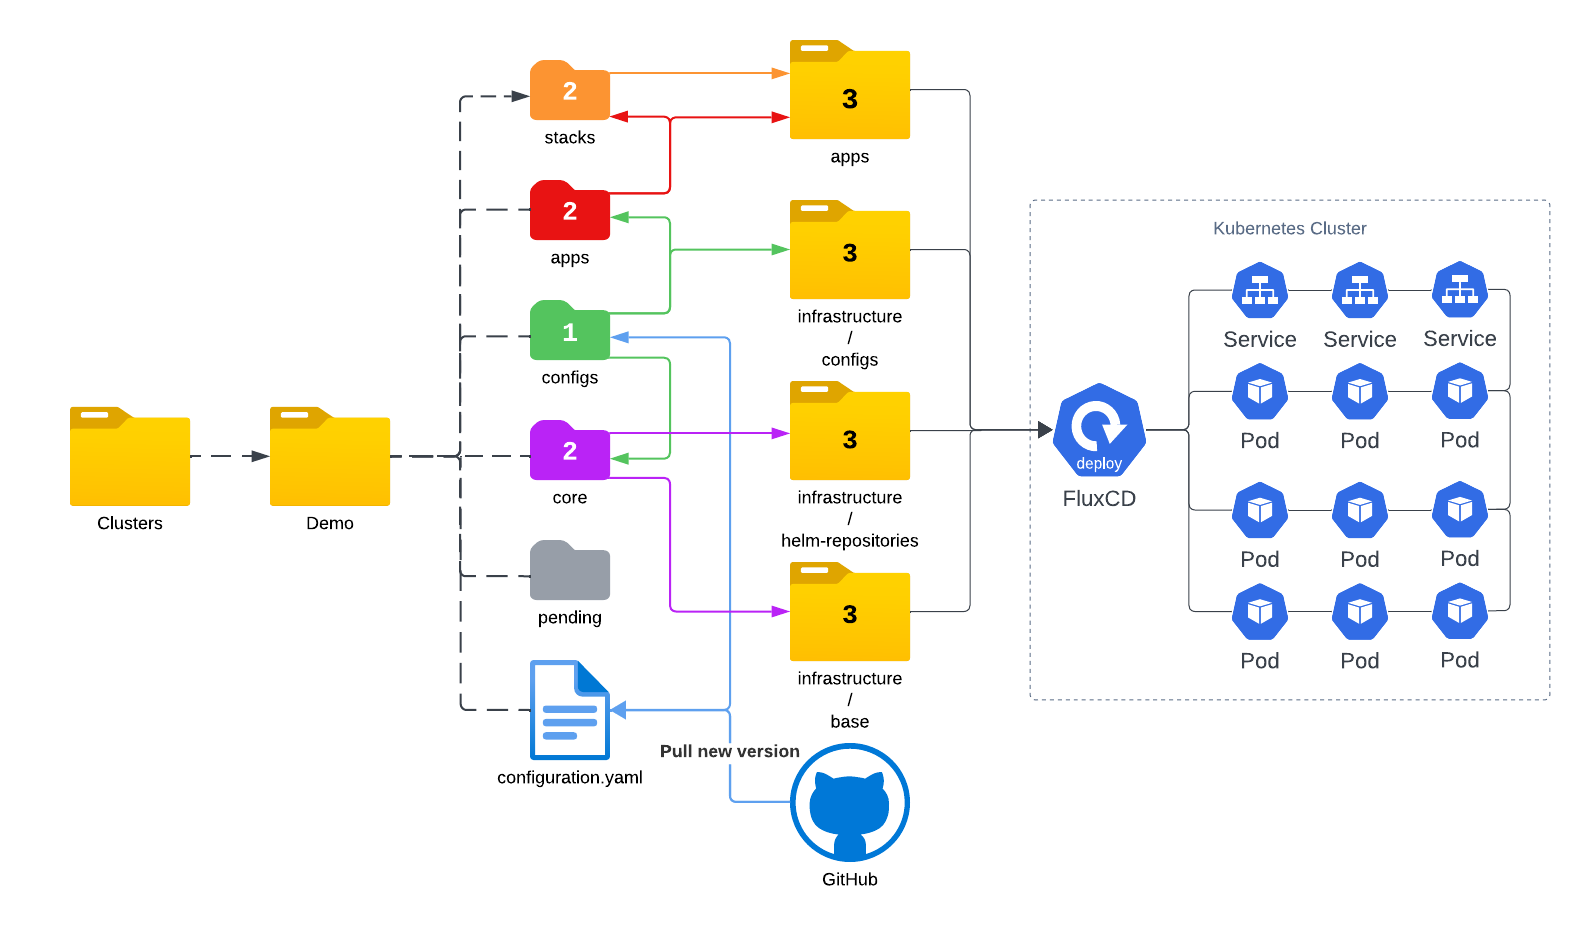
Let’s take a look at the folder structure first.
1 | ├── apps |
flux/install.yamlis used to install flux to the new cluster. flux CLI is purposefully avoided, as our intention is to ensure consistency in the version of Flux across different clusters.clusters/<cluster_name>/configuration.yamlis used to define the Git repository that is associated with the current cluster and establish the pivotal starting point for the reconciliation process of your cluster configuration. In our caseclusters/<cluster_name>/configis the starting point.
Kustomizations under the cluster directories play the role of specifying the elements slated for deployment within the cluster. The intricate deployment specifications for each application are compartmentalized into distinct sub-folders residing within the infrastructure and apps directories. Once an application attains the status of being considered a fundamental cluster component, it finds its place within the clusters/<cluster_name>/core directory. In our case I consider cert-manager and kong ingress controller to be the core of my cluster.
The remaining files are quite self-explanatory. Allow me to employ the following diagram to illustrate the flow.
Demo
Next let me give you a demo on how my flux-demo repo works.
Prerequisites:
Installation
On the official documentation they recommend to bootstrap your cluster with Flux CLI. There are two reasons that I don’t follow this path.
As stated on the documentation
It is also required that the person running the command to have push rights to the Git repository.I do not want flux to
pushchanges to my git repository. I like to control who and how the changes can be made. Flux should ONLY pull from certain branch and apply the changes.I want to remove Flux CLI as a dependency. I use
nix run nixpkgs#fluxcd -- install --export > flux/install.yamlto generate the installation yaml and usekubectl apply -f flux/install.yamlto install.
Create deploy key
Since we do not use Flux CLI to bootstrap, we need to create deploy key to allow flux to pull changes from the Git repository manually.
Generate key
The key pair is generated with ed25519 algorithm and stored in /tmp folder.
1 | ssh-keygen -t ed25519 -f /tmp/identity -N '' -C '' |
Create secret
Next we will create namespace flux-system and then create our secret demo-flux-auth in this namespace. Flux needs this key to pull from Git repository.
1 | kubectl create namespace flux-system |
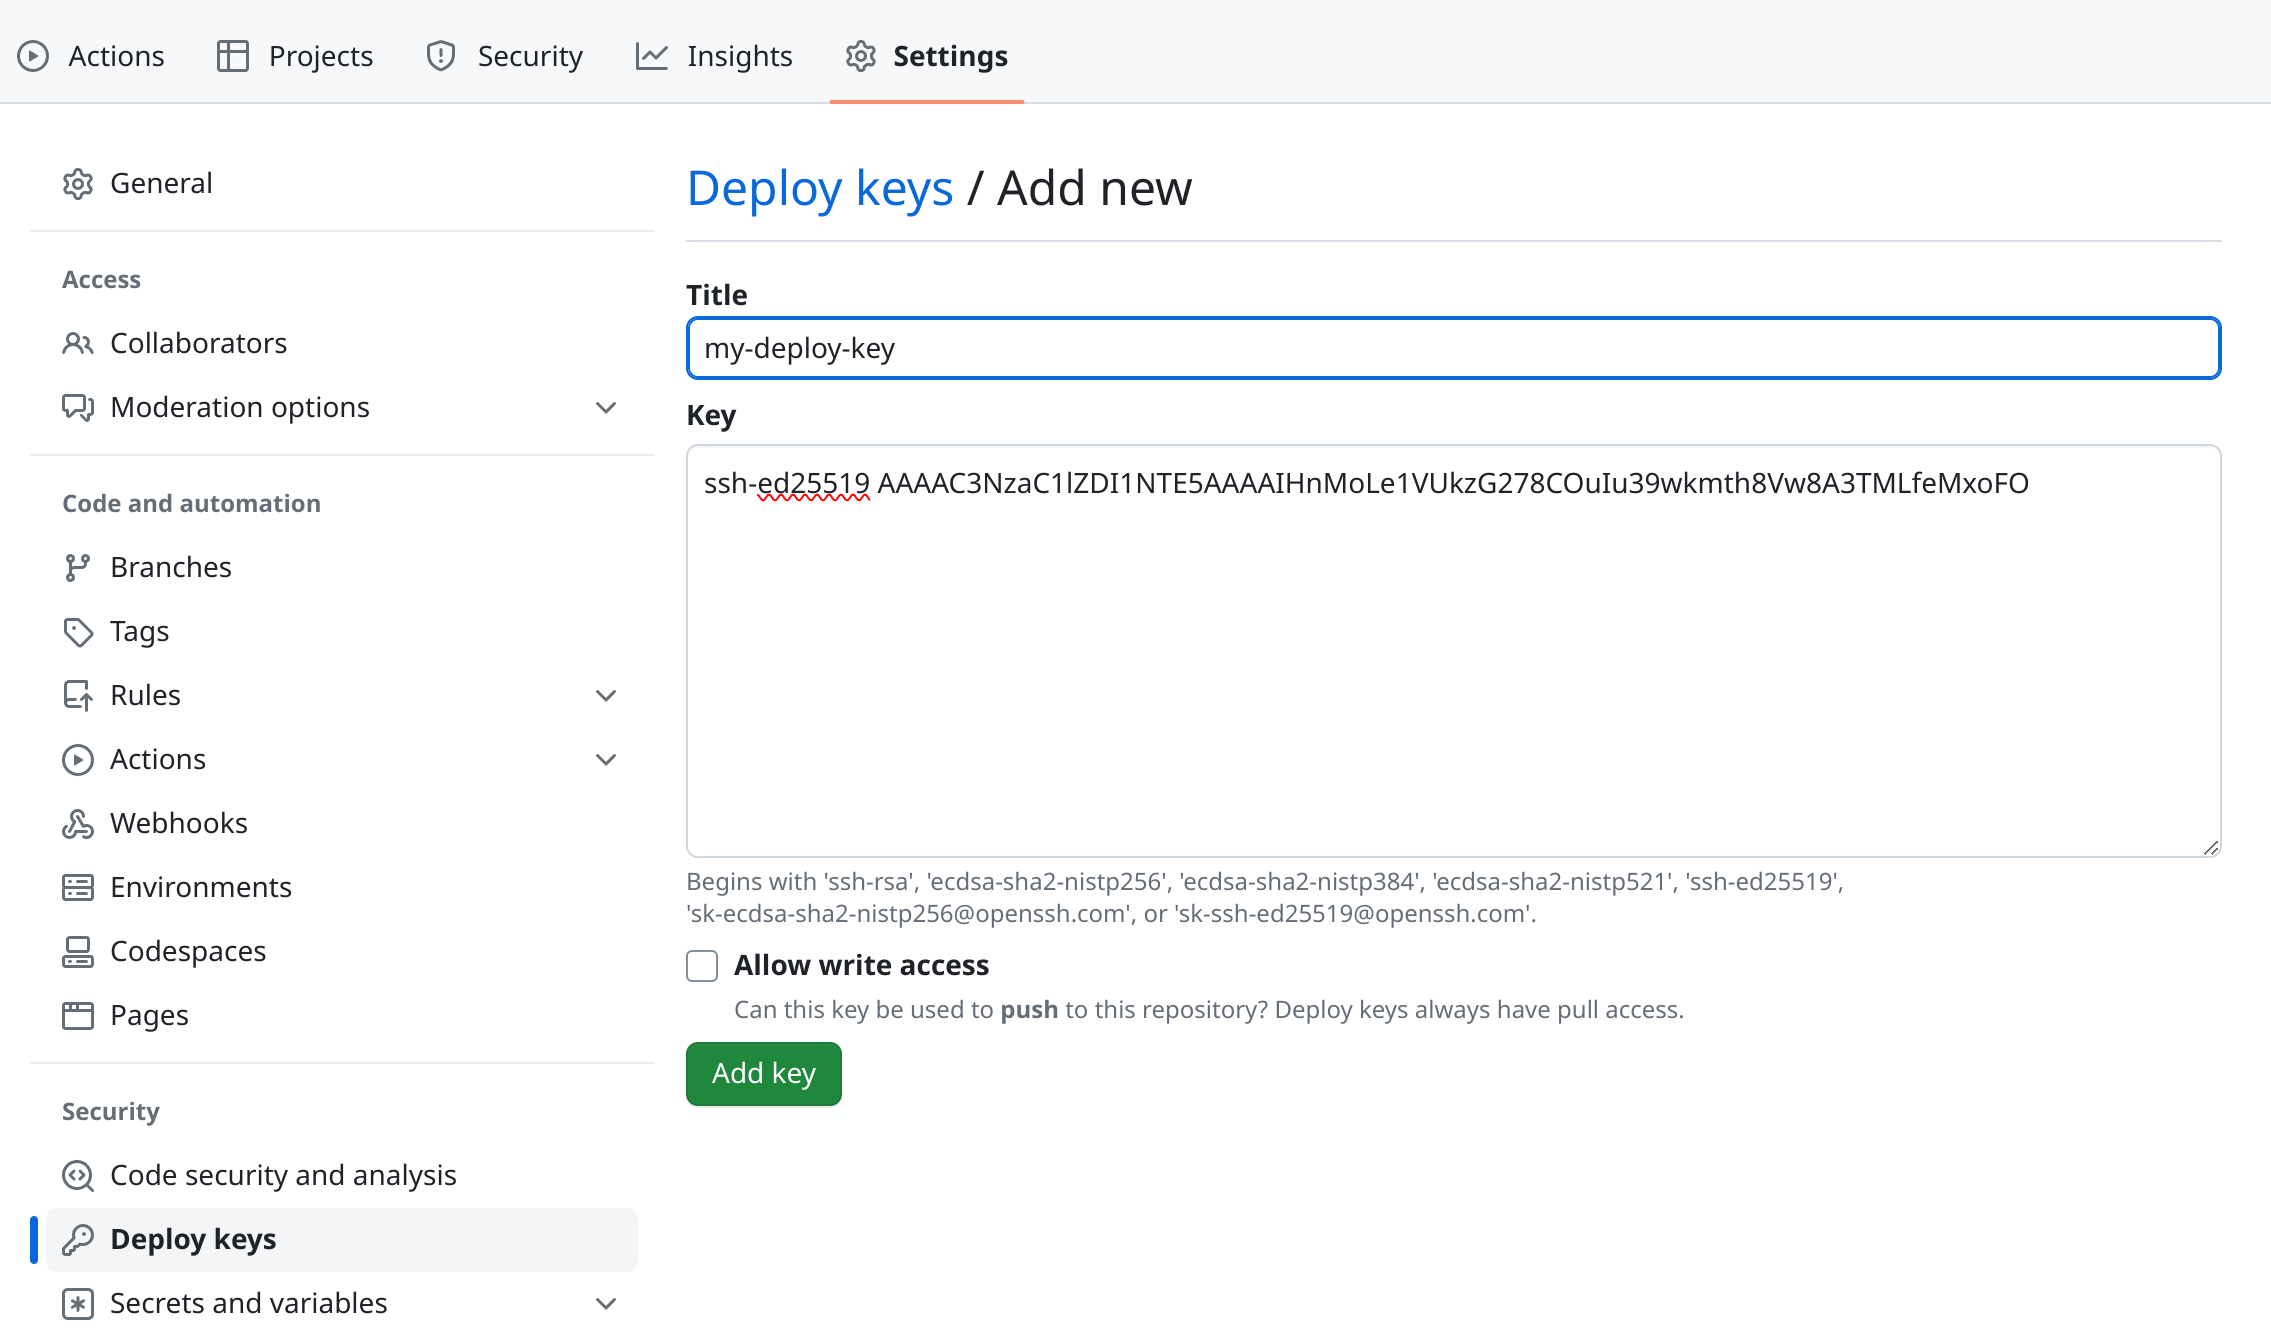
Upload to GitHub
Now we need to upload the public key to GitHub. Let’s get the public key first.
1 | ➜ cat /tmp/identity.pub |
Then we can add key to the repository under settings -> Deploy keys
Start deployment
Once the deploy key is ready, we can apply clusters/demo/configuration.yaml to start the chaining process. You can use flux get kustomizations --watch to see the changes.
Let’s take a closer look at configuration.yaml.
1 |
|
- GitRepository defines flux connects to git repo ssh://[email protected]/liyangau/flux-demo and pull from the main branch using the key stored in secret
demo-flux-auth. - Kustomization defines the starting point
./clusters/demo/configsand everything inside this folder will be applied to the cluster.As we can see, currently I have 4 Kustomizaitons in the configs folder, each file points to another folders/Kustomizations which can be chained to other processes until all reached their desire state.1
2
3
4
5├── configs
│ ├── apps.yaml
│ ├── base.yaml
│ ├── cert-manager.yaml
│ └── helm-repos.yaml
In my set up, service mesh and cert-manager get installed first, and then the ingress controller. These three components are considered the base. I also have a cert-manager.yaml to create a ClusterIssuer for my cluster and configs-kuma.yaml to enable mTLS in the mesh. The apps.yaml points to ./clusters/demo/apps/ folder which flux will install applications from.
Store secrets in Git
The next thing I want to talk about is about store secrets securely in Git. There are many tools you can choose from. If you use any cloud providers like AWS secret manager, Hashicorp vault, you might want to consider using external-secrets. For my home cluster I choose sops with age for it is simplicity.
Flux official documentation does a great job explaining how to use this. I just want to show you my workflow.
Generate key
This command creates a sops-key.txt file in the current folder with the private key.
Please remember to
- Add sops-key.txt to
.gitignore.- Backup sops-key.txt in a safe place.
1 | age-keygen -o sops-key.txt |
To view the recipient which is the public key we can use
1 | age-keygen -y sops-key.txt |
Encryption by user
I normally create my secret with --dry-run flag and remove creationTimestamp. first.
1 | kubectl create secret generic kc-admin-password \ |
Then I will encrypt it using sops. In below example, I save the encrypted file directly to my keycloak app folder.
1 | sops --age=$(age-keygen -y sops-key.txt) \ |
Decryption by flux
Flux needs the private key to decrypt the file. We need create secret sops-age in flux-system namespace first.
1 | kubectl create secret generic sops-age \ |
Then on the Kustomization CRD for the app, we need to add decryption section referencing this secret.
1 | apiVersion: kustomize.toolkit.fluxcd.io/v1 |
That’s all you need to do, flux will check out the repository, decrypt it and apply it to your cluster. The secrets on your cluster will be in plain text so make sure you limit the users to access the cluster.
I plan to add more app units in the future so you can simply move files from pending folder to apps, flux will do the rest for you.
That’s all I want to share with you today. See you next time.