How to Use Kong to Authenticate AWS RDS With IAM
UPDATE: 2024-March-13
Tested Kong Enterprise 3.5.0.3, it supports IMDSv2
Intro
If you users need to use postgres database. AWS RDS is a popular option especially if you use AWS stack for your applications.
In the latest 3.3.x release, Kong Enterprise enhance this experience by introducing a new feature to authenticate to AWS RDS database with AWS IAM.
Terraform
Here are the components we will use Terraform to deploy today.
You can also get the source code at https://github.com/liyangau/tf-ec2-iam-auth-rds. I will talk about my terraform files one by one. If you want to try the deployment right away you can jump to the last step to create the secrets.tfvars file and then you are good to go.
Provider
At the time I write this blog post, the latest version of aws provider is 5.5.0. I use pessimistic constraint operator ~> in case there are security fix for the 5.5.x version in the future.
Variables used:
- profile
- region
I put all variables on variables.tf, you can find this file at variables.tf. Let’s go ahead and save below to provider.tf.
1 | terraform { |
VPC
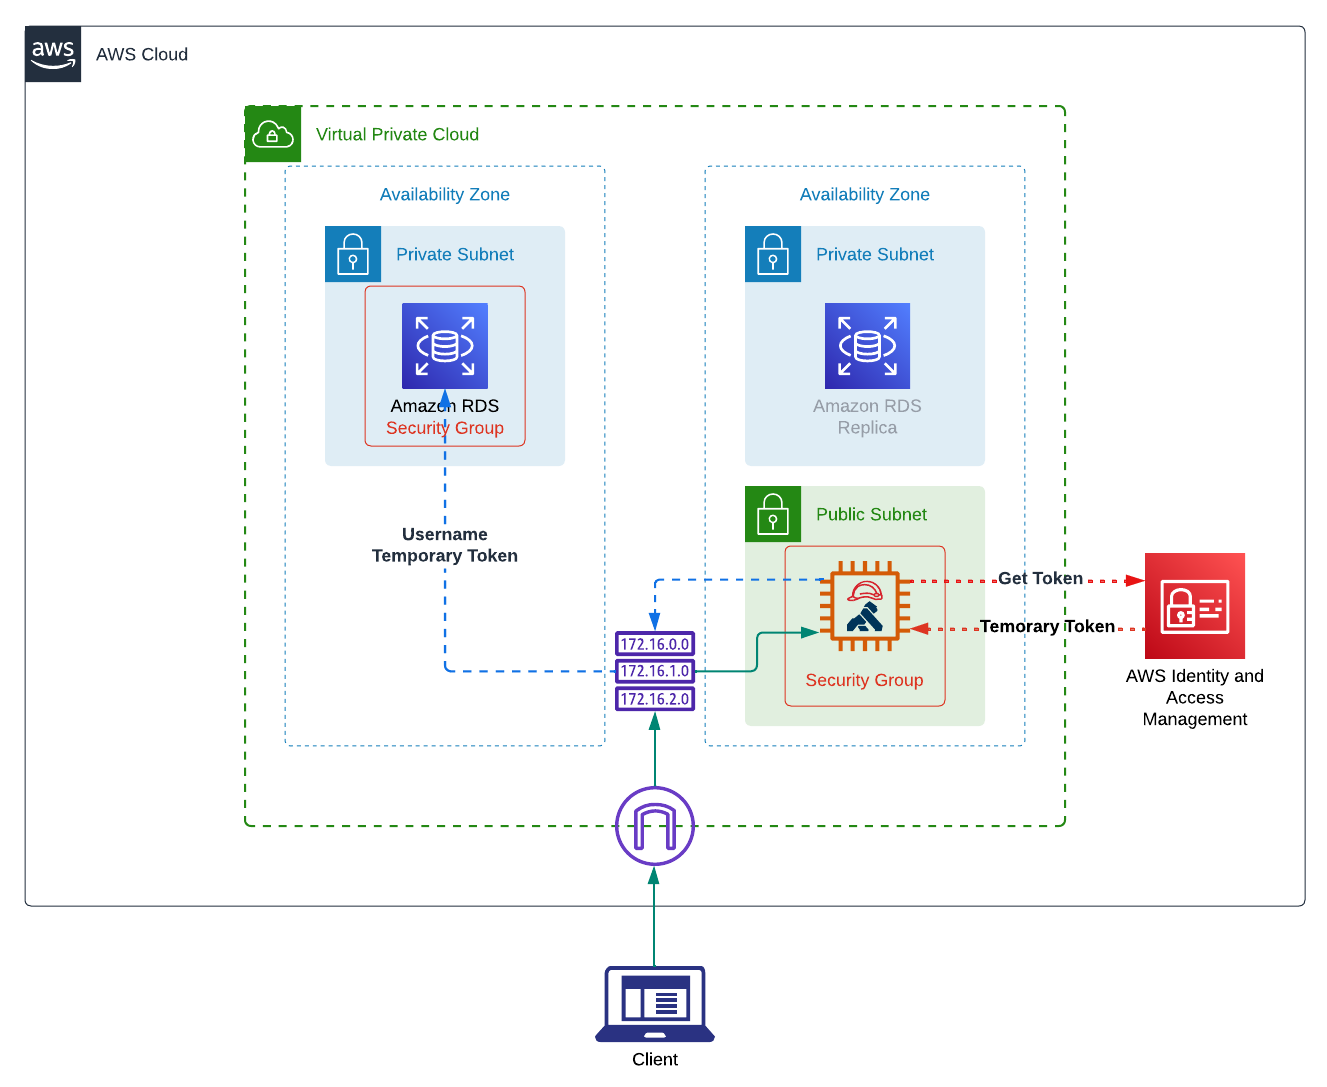
Let me borrow the image from official doc to demonstrate the relationship between these components.
VPC is the whole virtual network and we can create many Subnets in it. We can then create deploy different components in different subnets. For example, in this post I will deploy an EC2 in public subnet to receive public requests and a RDS instance in private subnet that can only be reached from instances in the same VPC. To received public requests, we need to use Internet Gateway for our VPC. Then we will use Route table to direct traffic to public subnet.
Variables used:
- stack_name
- vpc_cidr_block
- subnet_count
- public_subnet_cidr_blocks
- private_subnet_cidr_blocks
Let’s save below to vpc.tf.
1 | data "aws_availability_zones" "available" { |
Security groups
Security Groups is an external virtual firewall which controls traffic to your AWS resources. You can also use OS level firewalls (iptables for instance) at the same time to protect your instance further.
Here we are creating two security groups ec2_sg and db_sg. ec2_sg allows requests coming from port 22, 8000 and 8443 and going out to any ip and ports. db_sg allows requests coming in from port 5432 and from resources that has ec2_sg attached.
Let’s save below to security-groups.tf.
1 | resource "aws_vpc_security_group_ingress_rule" "ec2_ssh_ingress" { |
VM and RDS
Once we’ve got our networking and firewall defined, we can deploy our EC2 and RDS instance.
Generate SSH Key
In order to access our server, we need to create and attach SSH key to our EC2 instance.
You can also use SSM to access EC2 instance to avoid exposing port 22 to the internet.
We will generate our ssh key with ed25519 algorithm stored at ~/.ssh/kong-aws-iam-demo.key. This means a public key will be generated automatically in same folder as ~/.ssh/kong-aws-iam-demo.key.pub.
1 | ssh-keygen -a 100 -t ed25519 -f ~/.ssh/kong-aws-iam-demo.key -C "kong-iam-demo" |
Variables used:
- stack_name
- settings.ec2
- settings.database
- db_username
- db_password
Let me exaplain a little about what we deploy here. Firstly we need to find the Ubuntu AMI of the aws region. Then we will create an RDS instance in the private subnet. Once the RDS is deployed, IAM role rds will be created with policy to access RDS. Then EC2 instance will be deployed with an IAM instance profile to assume rds role. We will see IAM sections next.
let’s save below to main.tf.
1 | data "aws_ami" "ubuntu" { |
IAM
What we are doing here is to wait for RDS to be deployed, then we create an iam policy rds_policy to connect to this RDS instance. Next we attach this policy to IAM role rds, create IAM Instance profile with this role for our EC2 instance. One thing to know is that the policy only allows user kong to access our database. For more information, please check this AWS doc.
Let’s save below to iam.tf.
1 | resource "aws_iam_instance_profile" "rds" { |
Variables
Here are the variables we will use and I want to highlight a few of variables.
stack_name
This is the name I use for tagging and creating resources. It is easier to identify these resources on UI.subnet_count
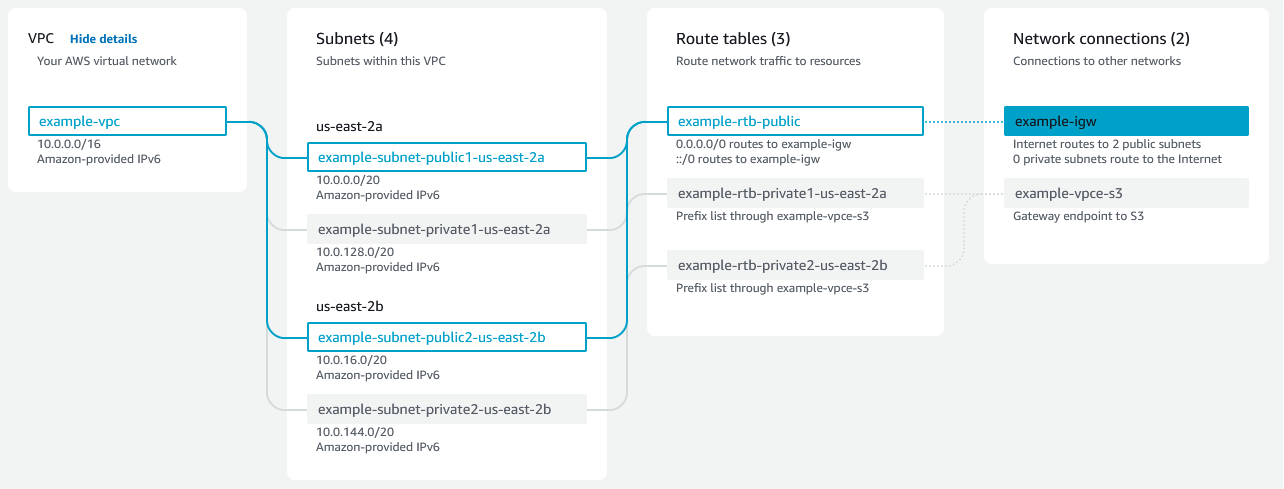
In this demo I create 1 public subnet and 2 private subnets to fullfill RDS DB requirements. For more information, please check this post from official knowledge center.vpc_cidr_block
You can use any CIDR blocks you wish. I see a lot of examples use10.0.0.0/16. To avoid overlapping CIDR blocks when you need VPC peering, you should use different CIDR blocks for different VPCs.settings.database.ca_cert_identifier.
According to official doc, default ca rds-ca-2019 are set to expire in Auguest 2024. I think it is good to start using the newer CAs when deploying new RDS instances. I use rds-ca-ecc384-g1 as default because I use ECC certificate whenever I can. Feel free to choose rds-ca-rsa2048-g1 or rds-ca-rsa4096-g1 if you prefer RSA certificates.db_username and db_password
I do not use any default values for these two variables and I will show you how to usesecrets.tfvarsto set these two variables. I also mark these two as sensitive to hide them from terraform output. You can also check the official doc to learn more.settings.ec2.http_tokens
This controls whether you want to enable IMDSv2. Unfortunately the latest version of Kong gateway (3.3.1.0) does NOT support IMDSv2 from testing. I will update this post once I know which version has the fix.settings.ec2.http_put_response_hop_limit
This is used to control HTTP PUT response hop limit for instance metadata requests. If you are running Kong in container, you need to set it to 2.
Let’s save below to variables.tf.
1 | variable "profile" { |
Output
To get EC2 public ip, public DNS name and RDS endpoint once terrafrom complete the deployment we need to use output.
Let’s save below to outputs.tf.
1 | output "ec2_public_ip" { |
secrets.tfvars
The last thing we need is secrets.tfvars.
If you have trouble creating password like I do, you can use pwgen -1cn 16 to generate a random password for db_password.
Then we can create secrets.tfvars as below.
1 | db_username = "<username>" |
With this file created, we can now deploy our infrastructure.
- Let’s run
terraform initto initialize our directory. - Then we can run
terraform plan -var-file="secrets.tfvars"and preview the changes we are making. - If everything looks right we can run
terraform apply -var-file="secrets.tfvars"to apply the changes.
Verify deployment
SSH to EC2
Once EC2 is ready we save EC2 public domain and IP to environment variable.
1 | export EC2_IP=$(terraform output -raw ec2_public_ip) |
Then we can ssh to EC2 with below command.
1 | ssh ubuntu@$EC2_DNS -i ~/.ssh/kong-aws-iam-demo.key |
Basic Auth to RDS
Next let’s test if we can access our RDS instance. We can use below command to install psql.
1 | sudo apt install postgresql-client |
Then we need to download te RDS CA certificate. You can use below command to download the CA Certificate bundle for all AWS region. You can also find region specific bundle on this article.
1 | curl https://truststore.pki.rds.amazonaws.com/global/global-bundle.pem -o global-bundle.pem |
Next let’s create some environment variable.
You should get RDS_ENDPOINT from terraform output. If you forget to write it down you can run
terraform output -raw database_endpointon your host machine to get it.
1 | export PG_HOST="<RDS_ENDPOINT>" |
Then we should be able to connect to our postgres database with below command.
1 | psql "host=$PG_HOST port=5432 sslmode=verify-full sslrootcert=$HOME/global-bundle.pem dbname=$PG_DATABASE user=$PG_USER password=$PG_PASSWORD" |
Prepare Postgres
To use IAM authentication, we need to make sure postgres user has rds_iam role. Let’s create user kong with rds_iam role assigned with below command.
1 | CREATE USER kong; |
IAM Auth to RDS
Install AWS CLI
To get IAM token, we need to use AWS CLI. We can use below command to install it on x86_64 Linux.
1 | sudo apt-get install unzip |
Auth with IAM Token
Then we can create these environment variables again but this time the postgres password is a temporary token from IAM.
Please note we need to set the username to kong this time.
1 | export PG_HOST="<RDS_ENDPOINT>" |
You can use echo $PG_PASSWORD to make sure the password is now a token. Then we can connect database with below command again.
1 | psql "host=$PG_HOST port=5432 sslmode=verify-full sslrootcert=$HOME/global-bundle.pem dbname=$PG_DATABASE user=$PG_USER password=$PG_PASSWORD" |
Kong use IAM Auth
You can run Kong in many ways. In today’s demo, I will run kong on this VM as a service. If you need to run Kong docker containers on this EC2, don’t forget to set
var.settings.ec2.http_put_response_hop_limitto 2 when you create the EC2 instance.
Kong Installation
Currently the latest Kong gateway version is 3.3.1.0. You can use below command to download Kong gateway package and install.
1 | wget https://download.konghq.com/gateway-3.x-ubuntu-jammy/pool/all/k/kong-enterprise-edition/kong-enterprise-edition_3.3.1.0_amd64.deb -O /tmp/kong.deb |
Modify Kong configs
Next we need to prepare the Kong config.
1 | sudo cp /etc/kong/kong.conf.default /etc/kong/kong.conf |
1 | sudo tee -a /etc/kong/kong.conf > /dev/null <<EOF |
Database migrations
The next step is to do our database migrations.
I use
sudohere because I logged in as user ubuntu.
1 | sudo kong migrations bootstrap |
If authentication works, the migration should run with below logs.
1 | ubuntu@ip-168-186-1-87:~$ sudo kong migrations bootstrap |
To verify, we can use the same method logging to our database. Then we can run kong=> \dt; to see the table. It should be similar to below.
1 | List of relations |
Start Kong
Now that database is bootstrapped, we can start Kong.
Kong has so many configurations that are self-documented on /etc/kong/kong.conf. You can also check official doc for more information. In the demo I will enable admin api to local access for creating some Kong entities.
Let’s run below in our terminal.
2
3
4
5
6
#-------------------------------------------------------------------------------
# Kong Config
# ------------------------------------------------------------------------------
admin_listen = 127.0.0.1:8001
EOF
Then we can start kong with sudo kong start.
Test Kong
Below demo creates a service to httpbin.org. If you do NOT want to send request externally, you can skip this section.
Create Service
1
2
3
4curl -X POST http://localhost:8001/services \
-H "Content-Type: application/json" \
-H "Accept: application/json, */*" \
-d '{"name":"test-service","url":"https://httpbin.org/anything"}'Create Route:
1
2
3
4curl -X POST http://localhost:8001/services/test-service/routes \
-H "Content-Type: application/json" \
-H "Accept: application/json, */*" \
-d '{"name":"test-route","paths":["/test"]}'Send request:
Now let’s send request from host and we should get 200 response as below.1
2
3
4
5
6
7
8
9
10
11
12
13
14
15
16
17
18
19
20
21
22
23
24
25
26
27
28
29
30
31
32➜ curl http://$EC2_DNS:8000/test -i
HTTP/1.1 200 OK
Content-Type: application/json
Content-Length: 546
Connection: keep-alive
Date: Tue, 04 Jul 2023 01:58:12 GMT
Server: gunicorn/19.9.0
Access-Control-Allow-Origin: *
Access-Control-Allow-Credentials: true
X-Kong-Upstream-Latency: 3223
X-Kong-Proxy-Latency: 1
Via: kong/3.3.1.0-enterprise-edition
{
"args": {},
"data": "",
"files": {},
"form": {},
"headers": {
"Accept": "*/*",
"Host": "httpbin.org",
"User-Agent": "curl/7.81.0",
"X-Amzn-Trace-Id": "Root=1-64a37cb2-2dad4c49426a2c35359a2ac0",
"X-Forwarded-Host": "ec2-3-27-123-6.ap-southeast-2.compute.amazonaws.com",
"X-Forwarded-Path": "/test",
"X-Forwarded-Prefix": "/test"
},
"json": null,
"method": "GET",
"origin": "122.199.59.206, 3.27.123.6",
"url": "https://ec2-3-27-123-6.ap-southeast-2.compute.amazonaws.com/anything"
}
That’s all I want to share with you today.
See you next time.