Redis is a powerful and versatile data storage system used by many applications for its speed and adaptability. It operates in-memory, making data access lightning-fast, and supports various data types, making it suitable for different purposes. Learning Redis is essential due to its industry-wide adoption and scalability.
Setting up Redis, especially Redis cluster and Redis sentinel, on virtual machines can be a bit tricky. You have to create multiple VMs, handle a bunch of config files, mess around with networking, and dive into system settings and it just takes a lot of time to get everything set up. But here’s where Docker comes to the rescue! Docker makes running Redis a breeze, smoothing out the whole process and the best part is you can effortlessly create and get rid of your environment whenever you need to.
In a past project, I found myself needing to set up different Redis environment regularly. To simplify this, I created a tool named redis-demo using a combination of a bash script and a Makefile, transforming the entire procedure into a set of straightforward make commands. After being tested by other people for quite some time, I thought it might be beneficial to share it with you. I hope it proves handy in your learning adventures or when you’re testing things out with Redis.
In today’s post, I intend to guide you through various Redis deployment models, explaining how to set them up with my tool and demonstrating how to test the features of each model.
Now you can cd to redis-demo folder, make some changes to the variables and then start testing redis.
Standalone
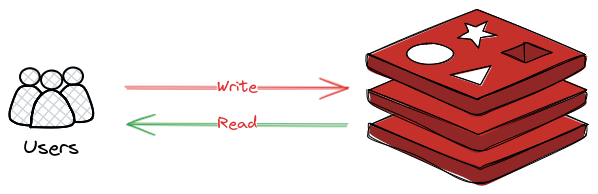
As the name suggested, standalone mode means Redis is running as an independent mater node, handling data reads and writes. Standalone mode is often used for simple user case, for example, I use it in the nextcloud config.
Environment set up
We can use make redis-single to spin up redis standalone mode. Container name is set to redis-demo.
1
2
3
4
➜ make redis-single
Creating new redis-demo container: 85534e852f843f2b4b833ade49ab429147735bc8b84e7d4c20571c8d32d15de7
Redis demo is running on host IPs and ports at: 172.19.0.2:32770
Redis demo is reachable in docker network redis-demo at: redis-demo:6379
Verification
Let’s connect to the container and see how it works.
If you have redis-cli installed on the host, you can also connect to redis via the exposed port. In above example, the exposed port is 32770 so we can connect to redis with redis-cli -h 127.0.0.1 -p 32770 -a A-SUPER-STRONG-DEMO-PASSWORD.
127.0.0.1:6379> keys * (empty array) 127.0.0.1:6379> set demo-key demo-value OK 127.0.0.1:6379> get demo-key "demo-value" 127.0.0.1:6379> incr test (integer) 1 127.0.0.1:6379> get test "1" 127.0.0.1:6379> flushall OK 127.0.0.1:6379> keys * (empty array)
Replication
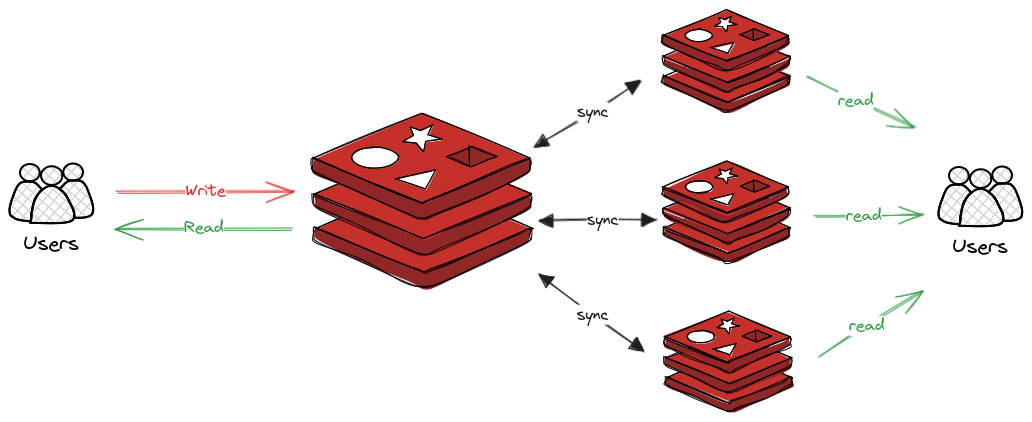
Redis replication mode involves creating a mater-replica (master-slave) configuration where a mater node handles write operations and replicates them to one or more replica nodes. The replica nodes handles read-only operations with existing dataset.
Some key features
Data Redundancy: Redis replication provides data redundancy by duplicating the dataset across multiple nodes. This minimizes the risk of data loss in case of a failure.
Read Scalability: Replica nodes can handle read operations, allowing for improved read scalability. Multiple read-only replicas can be utilized to distribute read traffic and enhance performance.
High Availability: If the mater node fails, a replicate node can be promoted to a mater, ensuring continuous service and minimizing downtime.
Environment set up
We can use make redis-replication to spin up 1 mater container redis-demo and 3 replicates redis-1 redis-2 and redis-3 by default.
1 2 3 4 5 6 7 8 9 10 11
➜ make redis-replication Creating new redis-demo container: 180016caf4d5a06ca90d19310608d8b3e34e5b3736537e1ab99d2d4ac3bd4e5a Redis demo is running on host IPs and ports at: 172.19.0.2:32776 Redis demo is reachable in docker network redis-demo at: redis-demo:6379
Creating replicate redis-1 container: badab00f3d493841550674bd2d4cc32de019ed1d61eae4064cd7666f4ac2bf93 Creating replicate redis-2 container: e0c85df843751a4138784b899aaa966505603e44bf472f0989b67fc9d31dd4f2 Creating replicate redis-3 container: 0da09efa55c131fd79c05e8aec5981459bac4c168c2cee324003bd8fc1693caf Your replicate nodes on host IPs and ports are:172.19.0.3:32777,172.19.0.4:32778,172.19.0.5:32779 In docker network redis-demo, your replicate nodes hostnames and ports are:redis-1:6379,redis-2:6379,redis-3:6379 In docker network redis-demo, your replicate nodes IPs and ports are:172.19.0.3:6379,172.19.0.4:6379,172.19.0.5:6379
Next let’s try writing some data to the mater node.
1 2 3 4 5 6 7 8 9 10
127.0.0.1:6379> keys * (empty array) 127.0.0.1:6379> set demo-key demo-value OK 127.0.0.1:6379> get demo-key "demo-value" 127.0.0.1:6379> incr test (integer) 1 127.0.0.1:6379> get test "1"
Reads from replicate
Let’s see what we get in the replica nodes.
1
docker exec -it redis-1 sh
1
redis-cli -a A-SUPER-STRONG-DEMO-PASSWORD
1 2 3 4 5 6 7 8 9 10
127.0.0.1:6379> keys * 1) "demo-key" 2) "test" 127.0.0.1:6379> get demo-key "demo-value" 127.0.0.1:6379> get test "1" 127.0.0.1:6379> incr test (error) READONLY You can't write against a read only replica. 127.0.0.1:6379>
As we can see we have the same data on the replica node and it is read only.
Redis Cluster
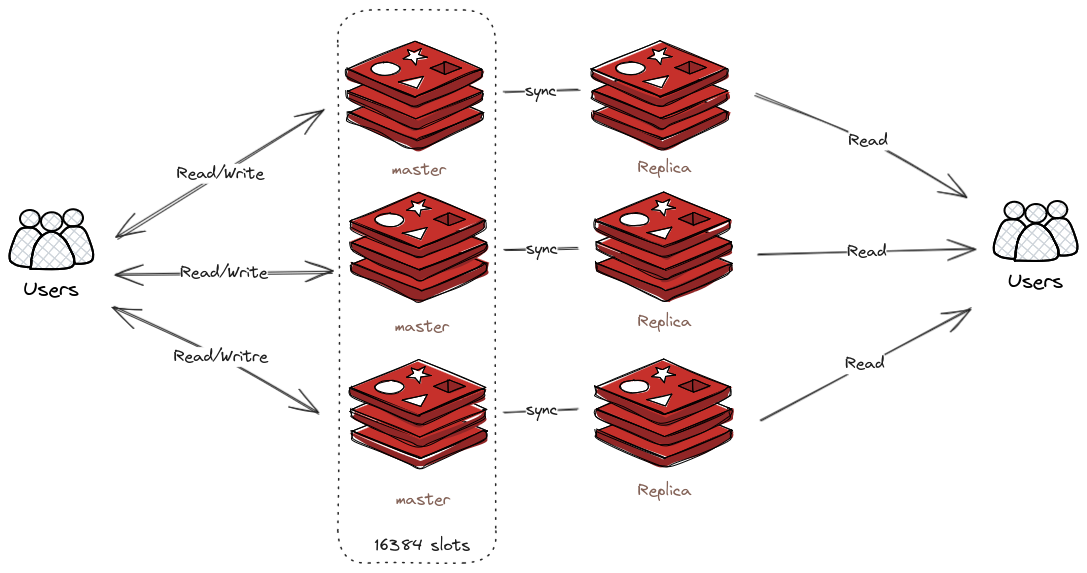
Redis Cluster is a distributed implementation of Redis that provides automatic sharding and high availability. Unlike traditional Redis setups, a Redis Cluster is designed to scale horizontally by dividing the dataset among multiple nodes, each responsible for a subset of the data.
Some key features
Multiple master node: Redis Cluster supports multiple mater nodes, allowing users to write data concurrently to different parts of the dataset. This enhances write throughput and overall system efficiency.
Automatic Sharding: Redis Cluster automatically divides the dataset into multiple shards, allowing it to distribute the load across different nodes.
Multiple Copies of Data: Each piece of data is stored on multiple nodes (mater and replicas), enhancing data redundancy and minimizing the risk of data loss.
Environment set up
We can use make redis-cluster to create up a 6 node (3 mater and 3 replica) redis cluster.
As you can see, the role for 172.19.0.4 and 172.19.0.5 had been swapped.
Writes to mater node
As we are in cluster mode, redis-cli will redirect to the right node for read and writes.
1 2 3 4 5 6 7 8 9 10 11 12 13 14 15 16 17
127.0.0.1:6379> set foo bar OK 127.0.0.1:6379> keys * 1) "foo" 127.0.0.1:6379> set hello world -> Redirected to slot [866] located at 172.19.0.2:6379 OK 172.19.0.2:6379> keys * 1) "hello" 172.19.0.2:6379> get foo -> Redirected to slot [12182] located at 172.19.0.4:6379 "bar" 172.19.0.4:6379> keys * 1) "foo" 172.19.0.4:6379> get hello -> Redirected to slot [866] located at 172.19.0.2:6379 "world"
Get all keys
As keys are stored on different node, keys * command only returns data on the local node. We can use --cluster call to execute commands on each node in the cluster.
1 2 3 4 5 6 7 8 9
/data # redis-cli -a A-SUPER-STRONG-DEMO-PASSWORD --cluster call 127.0.0.1:6379 KEYS "*" Warning: Using a password with '-a' or '-u' option on the command line interface may not be safe. >>> Calling KEYS * 127.0.0.1:6379: hello 172.19.0.3:6379: 172.19.0.4:6379: foo 172.19.0.2:6379: hello 172.19.0.7:6379: 172.19.0.5:6379: foo
As we can see it shows which nodes has what keys. We can also verify our set up is 1:1 mater and replica.
Redis Sentinel
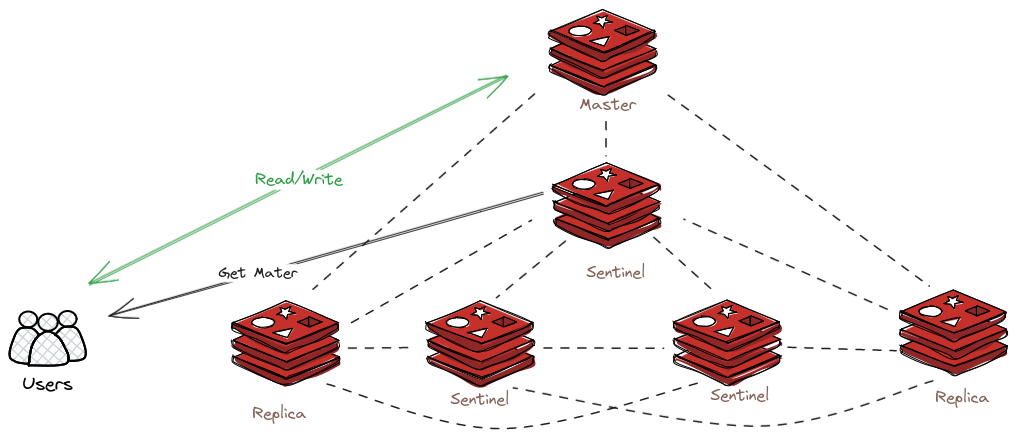
Redis Sentinel is a robust and automated monitoring tool designed to enhance the high availability and fault tolerance of Redis deployments. It provides high availability for Redis when not using Redis Cluster. It works seamlessly with Redis instances, constantly monitoring their health, and facilitating automatic fail over in the event of a node or mater failure. With Redis Sentinel, users can ensure the continuous availability of their Redis infrastructure, making it an essential component for mission-critical applications.
Some key features:
Monitoring: Sentinel constantly checks if your master and replica instances are working as expected.
Automatic fail over: In case of a mater node failure, Redis Sentinel orchestrates automatic fail over by promoting a slave to be mater, ensuring uninterrupted service.
Configuration provider: Sentinel acts as a source of authority for clients service discovery: clients connect to Sentinels in order to ask for the address of the current Redis master responsible for a given service. If a fail over occurs, Sentinels will report the new address.
Environment set up
We can use make redis-sentinel to create redis replication and 3 sentinel containers.
1 2 3 4 5 6 7 8 9 10 11 12 13 14 15 16 17
➜ make redis-sentinel
Creating new redis-demo container: 0fde93a0a600d6685a32500fc8d66c74c7884af07a870473a97e59200248fe88
Redis demo is running on host IPs and ports at: 172.19.0.2:32799
Redis demo is reachable in docker network redis-demo at: redis-demo:6379

Creating replicate redis-1 container: c48fc363a111f7cbb4eca282410b6d125b7c14ee92ede501e0c439d5271a80c4
Creating replicate redis-2 container: 6630a31c1f44ab7d496160f4151b0849be8737b234ea803baf3e314f68d10a3c
Creating replicate redis-3 container: 079419be809cc75c28d96ad46e7e34b6f168831ab478cc22beed853dd3f35570
Your replicate nodes on host IPs and ports are:172.19.0.3:32800,172.19.0.4:32801,172.19.0.5:32802
In docker network redis-demo, your replicate nodes hostnames and ports are:redis-1:6379,redis-2:6379,redis-3:6379
In docker network redis-demo, your replicate nodes IPs and ports are:172.19.0.3:6379,172.19.0.4:6379,172.19.0.5:6379
Creating redis-sentinel-1 container: e26eec38d7eef2d62b05af2aa8e957a40cea20588fd246e013018b5638e83169
Creating redis-sentinel-2 container: a06180b947e93165f572d6fc07dbcd9e77affe5dc8d2ee06eb3b05ea021d407d
Creating redis-sentinel-3 container: 8166045c5386392f08bc8e41bb441f3e6e206822ce39d38d2455035117cb181c
Your sentinel nodes on host IPs and ports are:172.19.0.6:32803,172.19.0.7:32804,172.19.0.8:32805
In docker network redis-demo, your sentinel nodes hostnames and ports are:172.19.0.6:26379,172.19.0.7:26379,172.19.0.8:26379
In docker network redis-demo, your sentinel nodes IPs and ports are:redis-sentinel-1:26379,redis-sentinel-2:26379,redis-sentinel-3:26379
Verification
Check sentinel
We can log in to any sentinel node. Let’s pick redis-sentinel-1
1
docker exec -it redis-sentinel-1 sh
Make sure to use port 26379.
1
redis-cli -p 26379 -a A-SUPER-STRONG-DEMO-PASSWORD
From the info, we know our deployment have 1 master which has 3 replicas and 3 sentinels for monitoring.
If we only need the master node IP address, we can run this command. Client does not need to check which is the master node, sentinel provides this information to user.