How to Use Redis With Kong Rate Limiting Plugins
Rate limiting plugin could be one of the most used plugins of any API gateways. Kong has two versions of Rate limiting plugins. One is the open sourced version and the other is the enterprise version. Configuration of both plugins are quite easy to understand and follow except for the Redis part. Especially when it comes to using Redis Sentinel, the official documentation does not provide a working example. I will try to explain how to use Redis in general with Rate limiting plugin.
Why Redis
I don’t want to go into too much detail about what Redis is. What we need to focus on is why we use Redis.
Both Kong rate limiting plugins supports storing rate limit counter in database, in memory or in Redis. When the counter is stored in database, all Kong nodes must be connected to the database in order to read and write counters. This means it does not work when you deploy Kong in dbless or hybrid mode. It is the same reason we can’t rely on storing counters in memory as different data planes will end up having their own counters.
Therefore Redis could be a better solution for storing counters, especially when you have multiple proxy nodes.
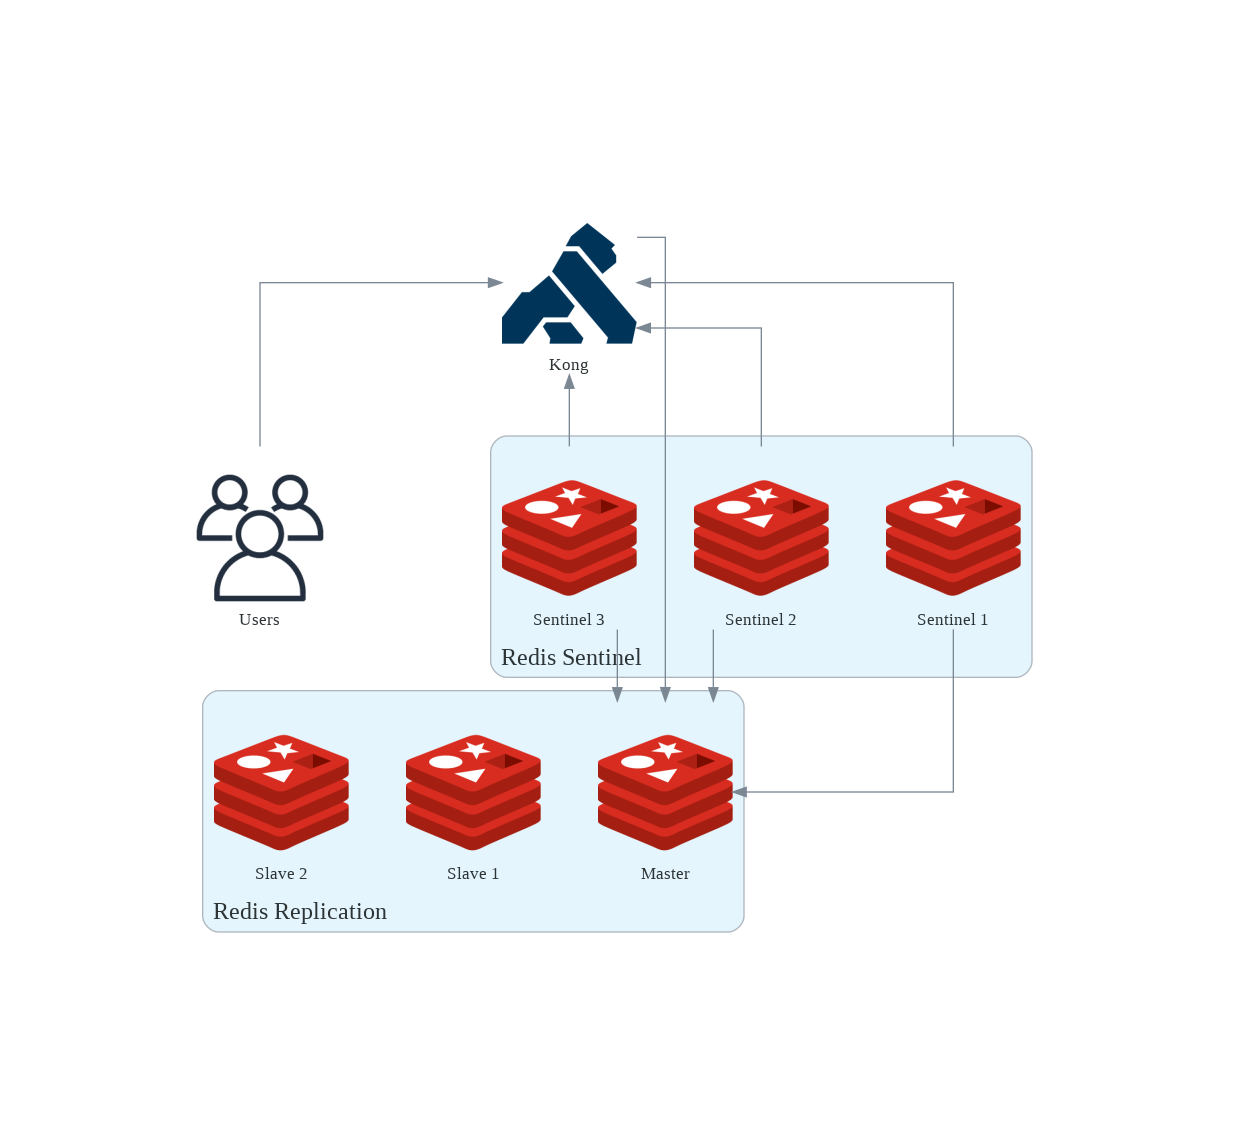
The open sourced plugin supports single node Redis while the Enterprise version support single node Redis, Redis Cluster and Redis Sentinel. If the single node failed, user will lose their counter. In order to achieve high availability, Redis cluster or Redis Sentinel must be used.
The differences between Redis Cluster and Redis Sentinel is that there are multiple master nodes with Redis cluster, therefore users can write more data at the same time. Redis Sentinel on the other has only 1 master node and sentinel will promote a slave of the Redis replication to be the new master when old one fail.
Redis-Demo tool
I’ve made a tool to start Redis on Docker for easy testing. You can get it on Github. It is very easy to use and all commands are listed on the repo README. Let me give you a brief introduction of how to use this tool.
Please make sure you have
docker,gitandmakeon your machine.
Clone Repo
1
git clone https://github.com/liyangau/redis-demo.git
Modify the Makefile if you want to, especially
NETWORK_NAME,REDIS_PASSWORDandREDIS_SSL_CN. If you don’t change anything, this script will create a docker network calledredis-demoand start Redis container in that network.Start a single node Redis container.
1
make redis-single
(OPTIONAL) If you need to test TLS you can start single Redis node with SSL by running
1
make redis-single-ssl
This will generate self-singed certificate and use
REDIS_SSL_CNas certificate common name.
You can use make redis-cluster or redis-sentinel to make a cluster or sentinel quickly. I will leave it to the you to explore.
Rate Limiting Plugin
Start Kong
With below command, we will create a Kong container in the redis-demo network so it can talk to our single node redis.
1 | docker run --rm --detach --name kong-demo \ |
Create Config
Below config creates two services and enable Rate limiting plugin globally. This plugin use Redis to store counter, because Kong container is running in the same network as Redis container, Kong can access this service by container name redis-demo:6379. I also set the rate limit to be 100 request per hour.
1 | _format_version: "2.1" |
Let’s save this file as test.yaml in our folder.
Test Plugin
Apply config to Kong
1
curl -X POST http://localhost:8001/config -s -F [email protected]
Access route
1
curl http://localhost:8000/demo1 -i
We should see response headers as below.
1
2
3
4
5X-RateLimit-Limit-Hour: 100
RateLimit-Reset: 2000
X-RateLimit-Remaining-Hour: 99
RateLimit-Remaining: 99
RateLimit-Limit: 100Check counter in Redis
Execute an interactive
bashin Redis container1
docker exec -it redis-demo /bin/sh
Use
redis-cliand authenticate with password1
redis-cli -a A-SUPER-STRONG-DEMO-PASSWORD
List keys on Redis
1
keys *
We should see results like
1
1) "ratelimit:00000000-0000-0000-0000-000000000000:00000000-0000-0000-0000-000000000000:50f449ee-6bbf-51e6-bbb0-7a4e41114207:1625040000000:hour"
Check keys value
1
get ratelimit:00000000-0000-0000-0000-000000000000:00000000-0000-0000-0000-000000000000:50f449ee-6bbf-51e6-bbb0-7a4e41114207:1625040000000:hour
We should get
"1"in the result (of course you should see this number go up if you send more than 1 request in that hour).
This is how we use single node Redis with Kong. Let’s move on to Rate limiting advanced plugin with Redis sentinel.
Rate Limiting Advanced Plugin
Start Kong
Please note you need a valid license to use Kong enterprise. Please modify
/path/to/license.jsonto the location of your license.
I am using DBless deployment as well for simple demo.
1 | docker run --rm --detach --name kong-demo \ |
Use Redis Sentinel
We will use redis-demo tool to start a 1 master, 2 slaves and 3 Redis sentinels cluster for our demo. In case the master node failed, sentinel will promote one of the slaves node to be the new master and then report the address back to Kong. Therefore Kong always knows where master node is.
Create Config
Similar to the config above, Kong is running in the same network as Redis cluster. Therefore Kong can access sentinel nodes with their host name and port 26379. We also sent config.redis.password and config.redis.sentinel_password, the first is used to communicate with master node and the second one is used to communicate with sentinel nodes.
1 | _format_version: "2.1" |
Let’s save this file as test.yaml in our folder.
Test Plugin
Apply config to Kong
1
curl -X POST http://localhost:8001/config -s -F [email protected]
Access route.
1
curl http://localhost:8000/demo1 -i
We should see response headers.
1
2
3
4
5RateLimit-Limit: 100
RateLimit-Remaining: 99
RateLimit-Reset: 22
X-RateLimit-Limit-minute: 100
X-RateLimit-Remaining-minute: 99Check counter in Redis
We should be able to see counter in both master and slave node so it does not matter which one we check.
Execute an interactive
bashin Redis container1
docker exec -it redis-demo /bin/sh
Use
redis-cliand authenticate with password1
redis-cli -a A-SUPER-STRONG-DEMO-PASSWORD
List keys on Redis
1
keys *
We should see results like
1
1) "1625053680:60:Ey0IlUKOgtJy6TnymXeUKZTuCZe4ycH2"
Check keys value
1
hgetall 1625053680:60:Ey0IlUKOgtJy6TnymXeUKZTuCZe4ycH2
We should see below in the result.
1
21) "50f449ee-6bbf-51e6-bbb0-7a4e41114207"
2) "1"
Test master node failover
Execute an interactive
bashin sentinel container.1
docker exec -it redis-sentinel-1 /bin/sh
Use redis-cli and authenticate with password and specify the sentinel port.
1
redis-cli -p 26379 -a A-SUPER-STRONG-DEMO-PASSWORD
If SSL is enabled, we can log in with
1
2
3
4
5redis-cli --tls \
--cert /etc/ssl/certs/redis.crt \
--key /etc/ssl/certs/redis.key \
--cacert /etc/ssl/certs/ca.crt \
-p 26379 -a A-SUPER-STRONG-DEMO-PASSWORDCheck master node IP
1
2
3
4
5
6
7
8127.0.0.1:26379> info sentinel
# Sentinel
sentinel_masters:1
sentinel_tilt:0
sentinel_running_scripts:0
sentinel_scripts_queue_length:0
sentinel_simulate_failure_flags:0
master0:name=mymaster,status=ok,address=172.19.0.2:6379,slaves=2,sentinels=3As we can see the mater node IP is
172.19.0.2.Force failover
1
2127.0.0.1:26379> sentinel failover mymaster
OKCheck master node IP again
1
2
3
4
5
6
7
8127.0.0.1:26379> info sentinel
# Sentinel
sentinel_masters:1
sentinel_tilt:0
sentinel_running_scripts:0
sentinel_scripts_queue_length:0
sentinel_simulate_failure_flags:0
master0:name=mymaster,status=ok,address=172.19.0.3:6379,slaves=2,sentinels=3Now the master node address changed to
172.19.0.3.
Check if Kong knows the new master
Access route again
1
curl http://localhost:8000/demo1 -i
Check counter in Redis
We should be able to see counter in both master and slave node so it does not matter which one we check.
Execute an interactive
bashin Redis container1
docker exec -it redis-demo /bin/sh
Use
redis-cliand authenticate with password1
redis-cli -a A-SUPER-STRONG-DEMO-PASSWORD
If SSL is enabled, we can log in with
1
2
3
4
5redis-cli --tls \
--cert /etc/ssl/certs/redis.crt \
--key /etc/ssl/certs/redis.key \
--cacert /etc/ssl/certs/ca.crt \
-a A-SUPER-STRONG-DEMO-PASSWORDList keys on Redis
1
keys *
We should see results like
1
1) "1625054820:60:Ey0IlUKOgtJy6TnymXeUKZTuCZe4ycH2"
Check keys value
1
hgetall 1625054820:60:Ey0IlUKOgtJy6TnymXeUKZTuCZe4ycH2
We should see below in the result.
1
2
1) "50f449ee-6bbf-51e6-bbb0-7a4e41114207"
2) "1
We can see Kong writes the new counter so it proofs that Kong knows the new master node IP.
Usage on Kubernetes
A more common use case is to deploy Redis on Kubernetes. In my demo I will be using bitnami/redis chart. Bitnami has two Redis chart, the one we are using can be used to deploy Redis single mode, Redis with Replication and Redis with Redis Sentinel. If you want to use Redis Cluster, you need to use bitnami/redis-cluster chart.
Let’s deploy a sample application with route /test first.
1 |
|
Use plugin with single Redis
Start Redis
You can use below to start a standalone redis node. You can see I’ve set a global password kong for this release.
1 | helm upgrade -i my-redis bitnami/redis -n redis \ |
This chart is very helpful, it will give you all the info and instructions you need for connecting to your pod.
Set up Rate Limiting Advance Plugin
1 | apiVersion: configuration.konghq.com/v1 |
Annotate Ingress
1 | kubectl annotate ingress echo-route konghq.com/plugins='rla-demo' |
Use plugin with Redis sentinel
Start Redis Sentinel
Below command will create a 3 pods. Each pod has redis and redis sentinel which can be access via port 6379 and 26379 respectively.
1 | helm upgrade -i my-redis bitnami/redis -n redis \ |
Set up Rate Limiting Advance Plugin
1 | apiVersion: configuration.konghq.com/v1 |
Annotate Ingress
1 | kubectl annotate ingress echo-route konghq.com/plugins='rla-demo' |
Check counters in Redis
Connect to redis node
Standalone Redis
1
kubectl exec -it -n redis my-redis-master-0 -- bash
Redis Sentinel
1
kubectl exec -it -n redis my-redis-node-0 -c redis -- bash
Now, if you want to check the redis info you can do
1
redis-cli -a kong
To check Sentinel info, you can do
1
redis-cli -a kong -p 26379
Once you are log in, you can follow above steps to check counters in redis.
That’s all I want to show today, thanks for reading.