How to Use Istio With Kong Ingress Controller
Transforming software from monolith to micro services is becoming a trend in the past few years. Covid-19 has undoubtedly pushed this transformation further. Previously I had talked a lot about using Kong as the API gateway to secure, transform and monitor client requests to upstream services. What about traffics between internal services? The answer is using Service Mesh.
According to this article on solo.io, Istio has the most market share at the moment. In today’s post, I would show you how to use Kong Ingress Controller with Istio including demos of enabling mTLS, adding AuthorizationPolicy, change traffic distribution using VirtualService and DestinationRule.
Let’s get started.
Prerequisites:
- Istioctl: If you haven’t installed it, you can follow the official doc.
- Helm: I need to use helm to install Kong. Helm version is 3.7.1.
- Your cluster need to be able to provision
LoadBalancer. I am using metalLB locally.
Install Istio
As suggested by official documentation, I am going to install istio with minimal configuration profile first. Then I will install Kong Ingress Controller or Istio Ingress Gateway to allow requests entering the mesh.
1 | istioctl install --set profile=minimal \ |
Install BookInfo
We will use istio’s bookinfo in our demo.
1 | # Create namespace bookinfo |
Next I will show you some basic usage of Istio Ingress Gateway so we can compare it with Kong Ingress Controller. If you are only interested in testing Kong Ingress controller, you can go to the next section.
(Optional) Istio Ingress Gateway
Installation
Add helm chart
1
2
helm repo add istio https://istio-release.storage.googleapis.com/charts
helm repo updateInstall Istio Ingress Gateway
1
2
kubectl create namespace istio-ingress
helm install istio-ingress istio/gateway -n istio-ingress --waitOnce the pod is ready, let’s save load balancer IP to
ISTIO_INGRESS_GATEWAY.1
export ISTIO_INGRESS_GATEWAY=$(kubectl -n istio-ingress get svc istio-ingress -o=jsonpath='{.status.loadBalancer.ingress[0].ip}')
Let’s curl $ISTIO_INGRESS_GATEWAY
1 | curl -s http://$ISTIO_INGRESS_GATEWAY -iv |
We would get Connection refused error because istio ingress gateway requires Gateway resource to receive incoming HTTP/TCP connections.
1 | * Trying 172.18.18.150:80... |
Create Gateway
Let’s create a Gateway resource.
1 | kubectl apply -f - << EOF |
Then we can try sending the request again and we should be able to connect
1 | curl http://$ISTIO_INGRESS_GATEWAY -iv |
Create VirtualService
Next step we will use VirtualService to route requests to service productpage at port 9080.
1 | kubectl apply -f - << EOF |
Now we can access the product page.
1 | curl http://$ISTIO_INGRESS_GATEWAY/productpage |
Enable JWT auth
We can also enable JWT authentication on ingress gateway by applying below RequestAuthentication and AuthorizationPolicy.
1 | kubectl apply -f - << EOF |
If we access curl http://$ISTIO_INGRESS_GATEWAY/productpage -i again, we will get 403 Forbidden.
1 | HTTP/1.1 403 Forbidden |
To access productpage again we need to pass a JWT token with authorization bearer header in our request.
1 | curl http://$ISTIO_INGRESS_GATEWAY/productpage -H "Authorization:Bearer eyJ0eXAiOiJKV1QiLCJhbGciOiJSUzI1NiJ9.eyJpc3MiOiJpc3Rpby10ZXN0aW5nQGF1Zm9tbSIsInN1YiI6ImlzdGlvLXRlc3RpbmdAYXVmb21tIiwidGVzdCI6ImlzdGlvIn0.bkWG-fESbgVUcWBSfa-i4q7ZNY_gk3LO18CDcjz07w74JaoDvSIn347LQrm5pF8r6Hb1lmhlC6p7y4iCDNeWPZ6azqpql4MPEAdM2sZvZphriJFj8XCuKsW4Qn2yOohsPm4QsRDUKxME8wMswPqfQo__0DSUgo7bv56HsBTrb7mAKoLw4qiv_MRjU9X_FwP75JgNh64rGUfKnSU1jWLgwlQH7_jcxHdSK57QvvFcjxgfSBAJ62vOmQld9goVQn8Q7M-cQmrgs3SDeuV0XhNjY3Ifp-jjx4PBphu5UPIZNyHWZ3nLM4GN518-DUbsYGYs1KbrLQZmlMk6oDSAyIdszQ" |
Let’s move on and try Kong Ingress Controller.
Install Kong
I will install Kong in dbless mode in namespace kong and auto inject istio sidecar proxy.
1 | # Add kong helm chart repo |
Once the Pod is running, we can save kong proxy ip to KONG_PROXY_IP.
1 | export KONG_PROXY_IP=$(kubectl -n kong get svc my-kong-kong-proxy -o=jsonpath='{.status.loadBalancer.ingress[0].ip}') |
Use Kong Ingress Controller
As I mentioned in my previous post, Kong ingress controller use CRDs and annotations to extend native kubernetes objects.
Create Ingress
Let’s start by creating an Ingress object. This ingress object has the same routes as the VirtualSerivce above.
1 | kubectl apply -f - << EOF |
Now we can access /productpage via Kong.
1 | curl $KONG_PROXY_IP/productpage |
Enable JWT plugin
We will then use JWT plugin to restrict access. I am applying the plugin globally.
1 | kubectl apply -f - << EOF |
Now when we access /productpage route again,
1 | curl $KONG_PROXY_IP/productpage -i |
we should get 401 Unauthorized error.
1 | HTTP/1.1 401 Unauthorized |
If we pass in an authorization bearer header, we are allowed to access the service again.
1 | curl -s http://$KONG_PROXY_IP/productpage -H "Authorization:Bearer eyJ0eXAiOiJKV1QiLCJhbGciOiJSUzI1NiJ9.eyJpc3MiOiJpc3Rpby10ZXN0aW5nQGF1Zm9tbSIsInN1YiI6ImlzdGlvLXRlc3RpbmdAYXVmb21tIiwidGVzdCI6ImlzdGlvIn0.bkWG-fESbgVUcWBSfa-i4q7ZNY_gk3LO18CDcjz07w74JaoDvSIn347LQrm5pF8r6Hb1lmhlC6p7y4iCDNeWPZ6azqpql4MPEAdM2sZvZphriJFj8XCuKsW4Qn2yOohsPm4QsRDUKxME8wMswPqfQo__0DSUgo7bv56HsBTrb7mAKoLw4qiv_MRjU9X_FwP75JgNh64rGUfKnSU1jWLgwlQH7_jcxHdSK57QvvFcjxgfSBAJ62vOmQld9goVQn8Q7M-cQmrgs3SDeuV0XhNjY3Ifp-jjx4PBphu5UPIZNyHWZ3nLM4GN518-DUbsYGYs1KbrLQZmlMk6oDSAyIdszQ" |
Next we will explore some istio features and see how it works with Kong ingress controller.
Use Istio features
Monitor Mesh
Monitoring might be one of the most important features that you use service mesh for. I will use official sample yaml file to install kiali dashboard and prometheus and jaeger will be used to get some data from mesh
1 | kubectl apply -f https://raw.githubusercontent.com/istio/istio/master/samples/addons/prometheus.yaml |
Once pods is ready, we can access dashboard with istioctl dashboard kiali.
Let’s go to Graph and then let’s tick Security in the Display dropdown. Please make sure we are checking Namespace bookinfo. After that, let’s send some requests.
1 | while true |
We should see below traffic flow.
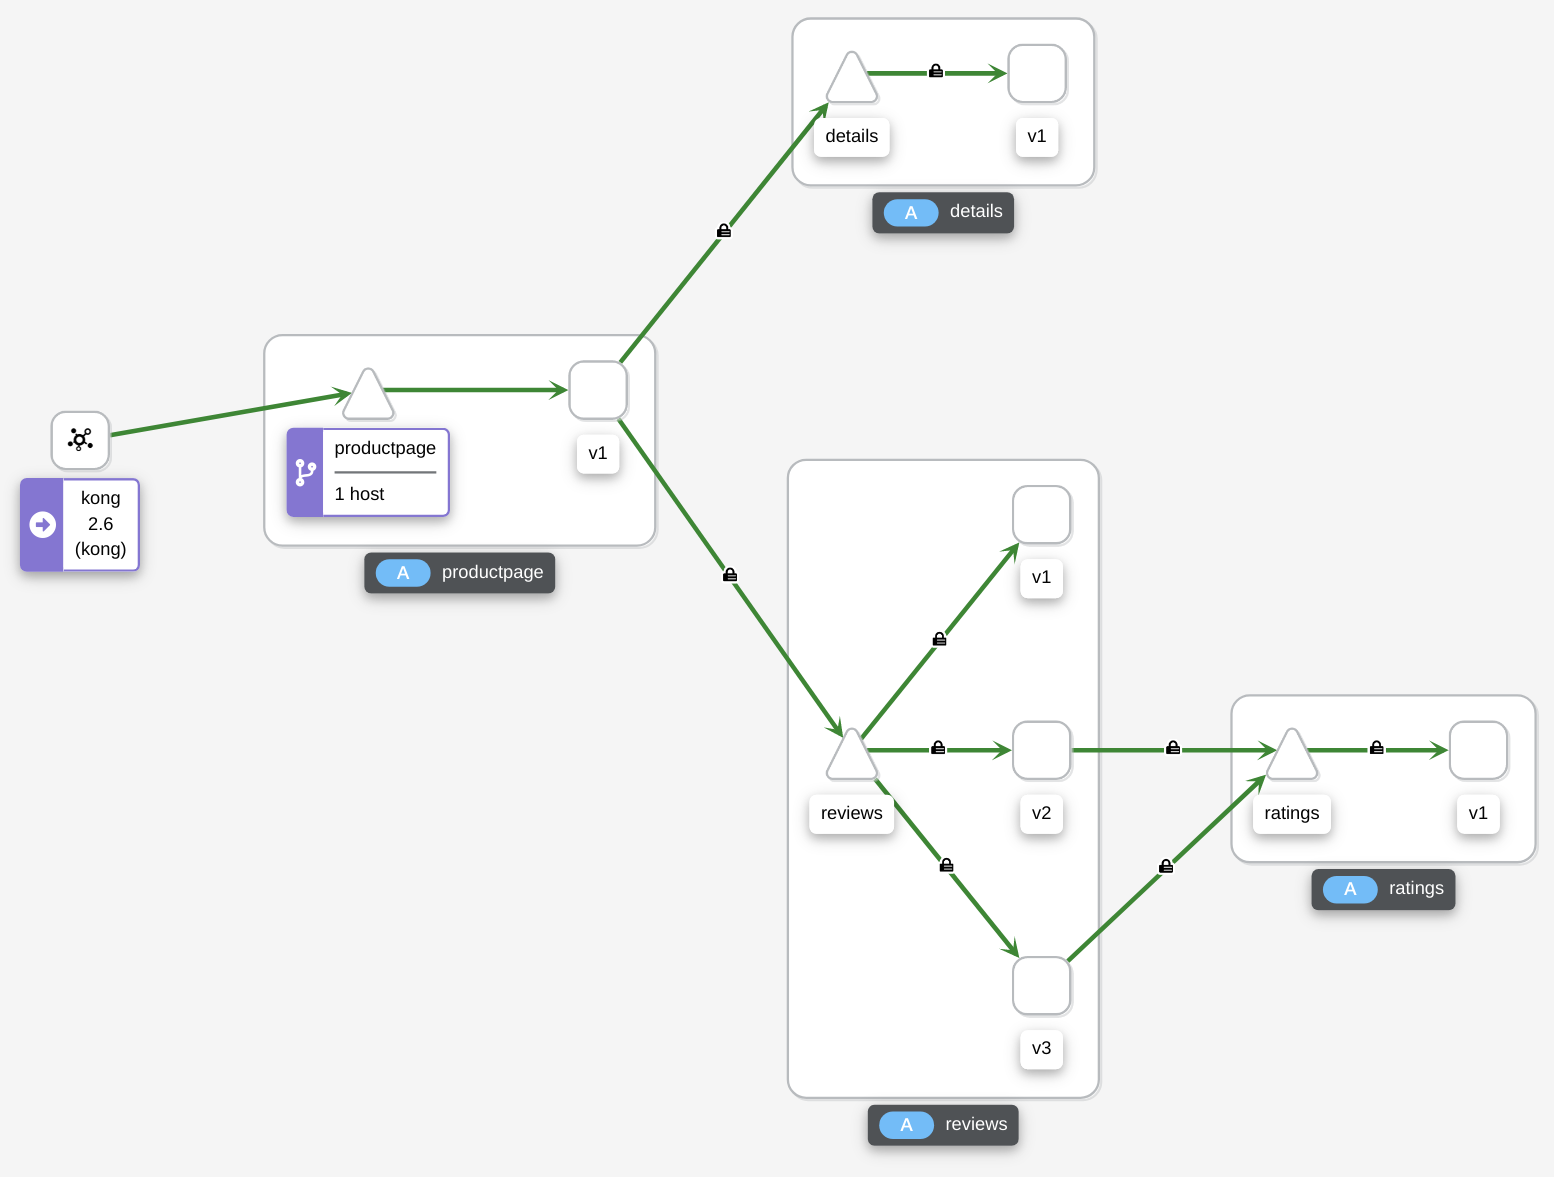
As we can see not all traffics are encrypted.
Enable mTLS
Zero Trust architecture requires ALL traffics to be encrypted and verified. We can enable mTLS easily with istio to achieve this goal. What we need to do is to apply below PeerAuthentication in root namespace istio-system. This will enable strict mTLS in the mesh.
1 | kubectl apply -f - <<EOF |
If we visit curl $KONG_PROXY_IP/productpage now we will get curl: (56) Recv failure: Connection reset by peer error because the sidecar in Kong pod is expecting a client certificate to be passed in with the request. As Kong ingress controller is our entry point, we want to allow requests coming in. What we need to do is to disable PeerAuthentication in kong namespace so the traffic between Kong and Bookinfo remains encrypted and the client requests enter the mesh via Kong.
1 | kubectl apply -f - <<EOF |
Once that’s added, let’s try curl $KONG_PROXY_IP/productpage again. This time you would get upstream connect error or disconnect/reset before headers. reset reason: connection termination error. To fix this issue we need to annotate productpage service and our ingress.
1 | kubectl -n bookinfo annotate service productpage ingress.kubernetes.io/service-upstream=true |
The first annotation ingress.kubernetes.io/service-upstream=true allows Kong to send request to this service ip address instead of the pod IP.
The second annotation konghq.com/preserve-host=false helps us to NOT preserve request host header. The reason is that we want productpage to get the request from sidecar.
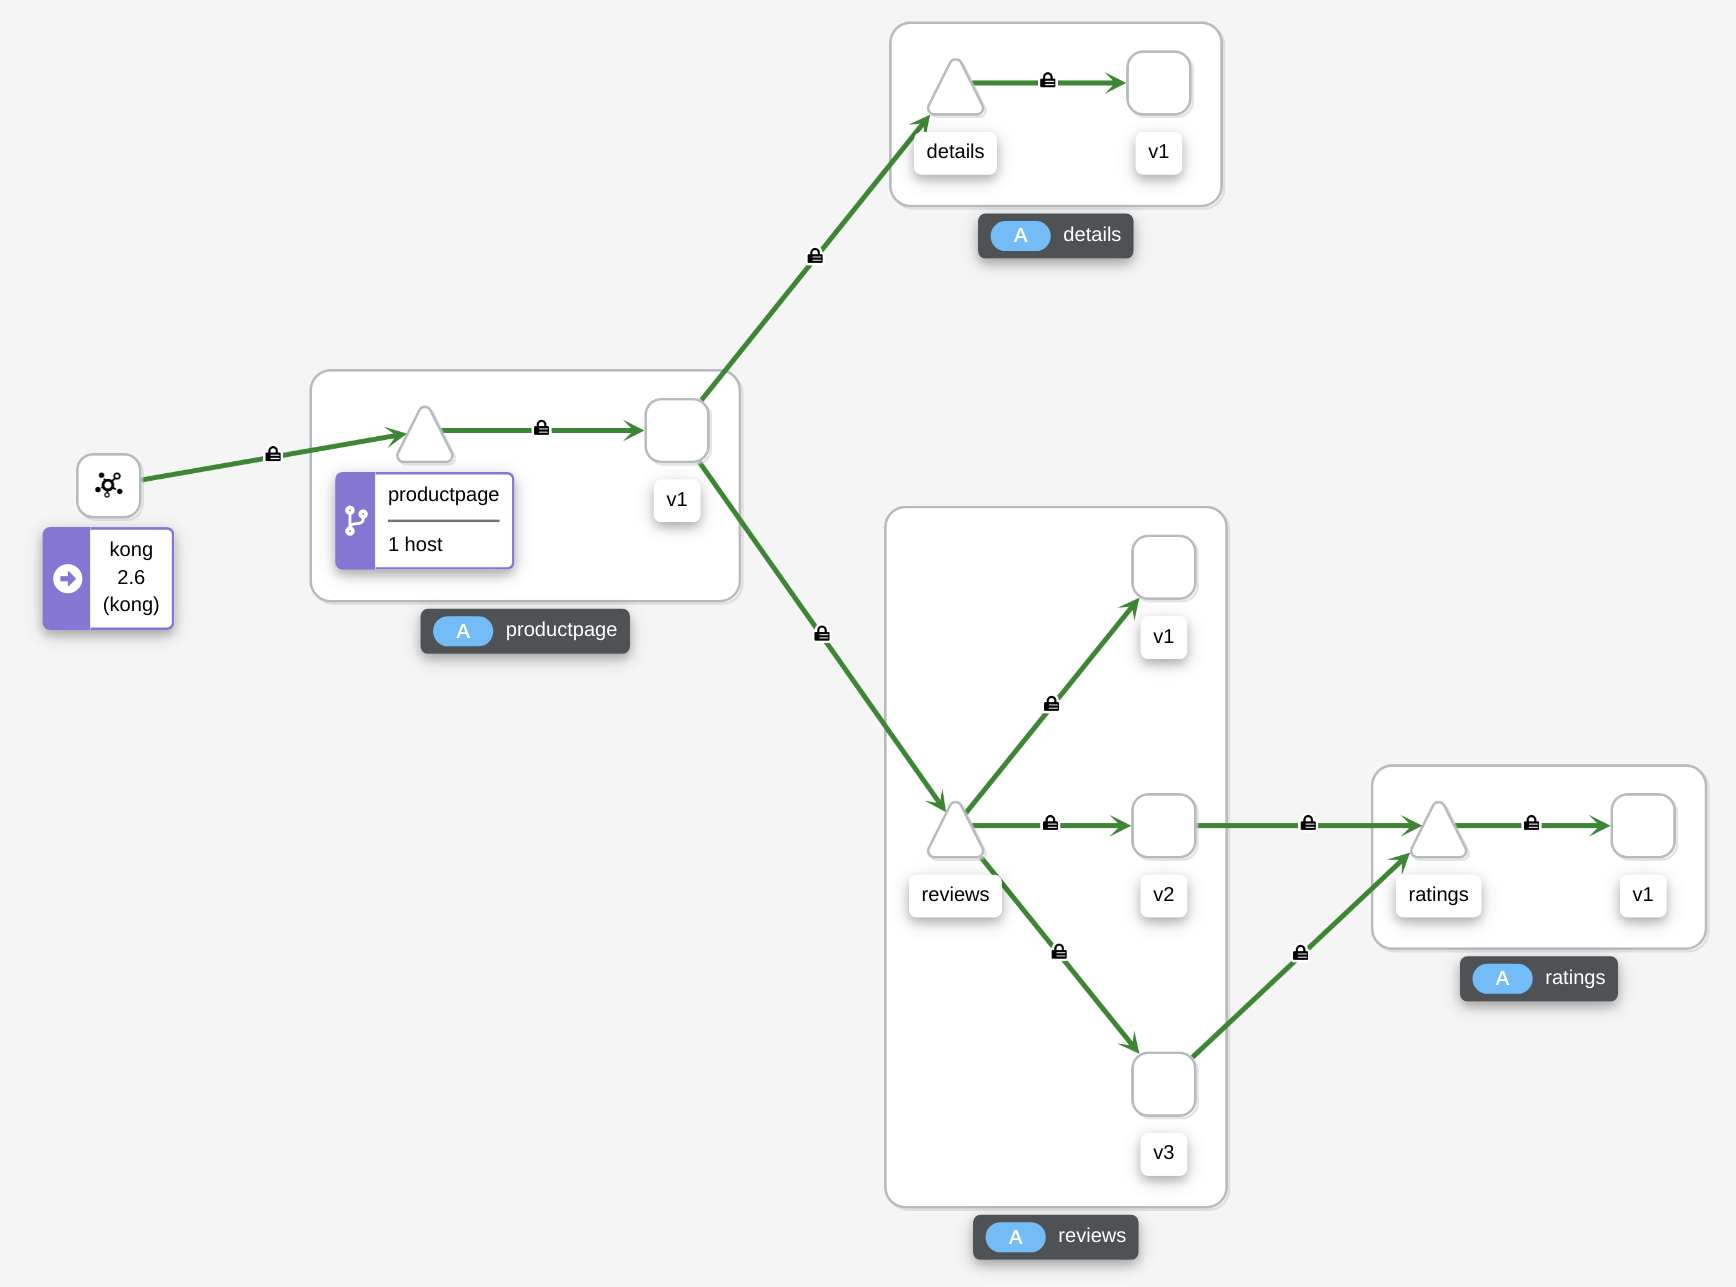
After applying annotations we can send our request again and we should see below in graph. As we can see ALL traffic are secured now.
Split Traffics
Kong can be used to load balance client requests to different backends. However when the backend services are not directly connected to Kong, there is not much Kong can do. For example, in our demo Kong has no control over which review pod productpage send requests to. In order to route requests as we want them to, we can use VirtualService and DistinationRule to fine tune traffic inside mesh.
Let me give you an example. Let’s continue sending our request to /productpage.
1 | while true |
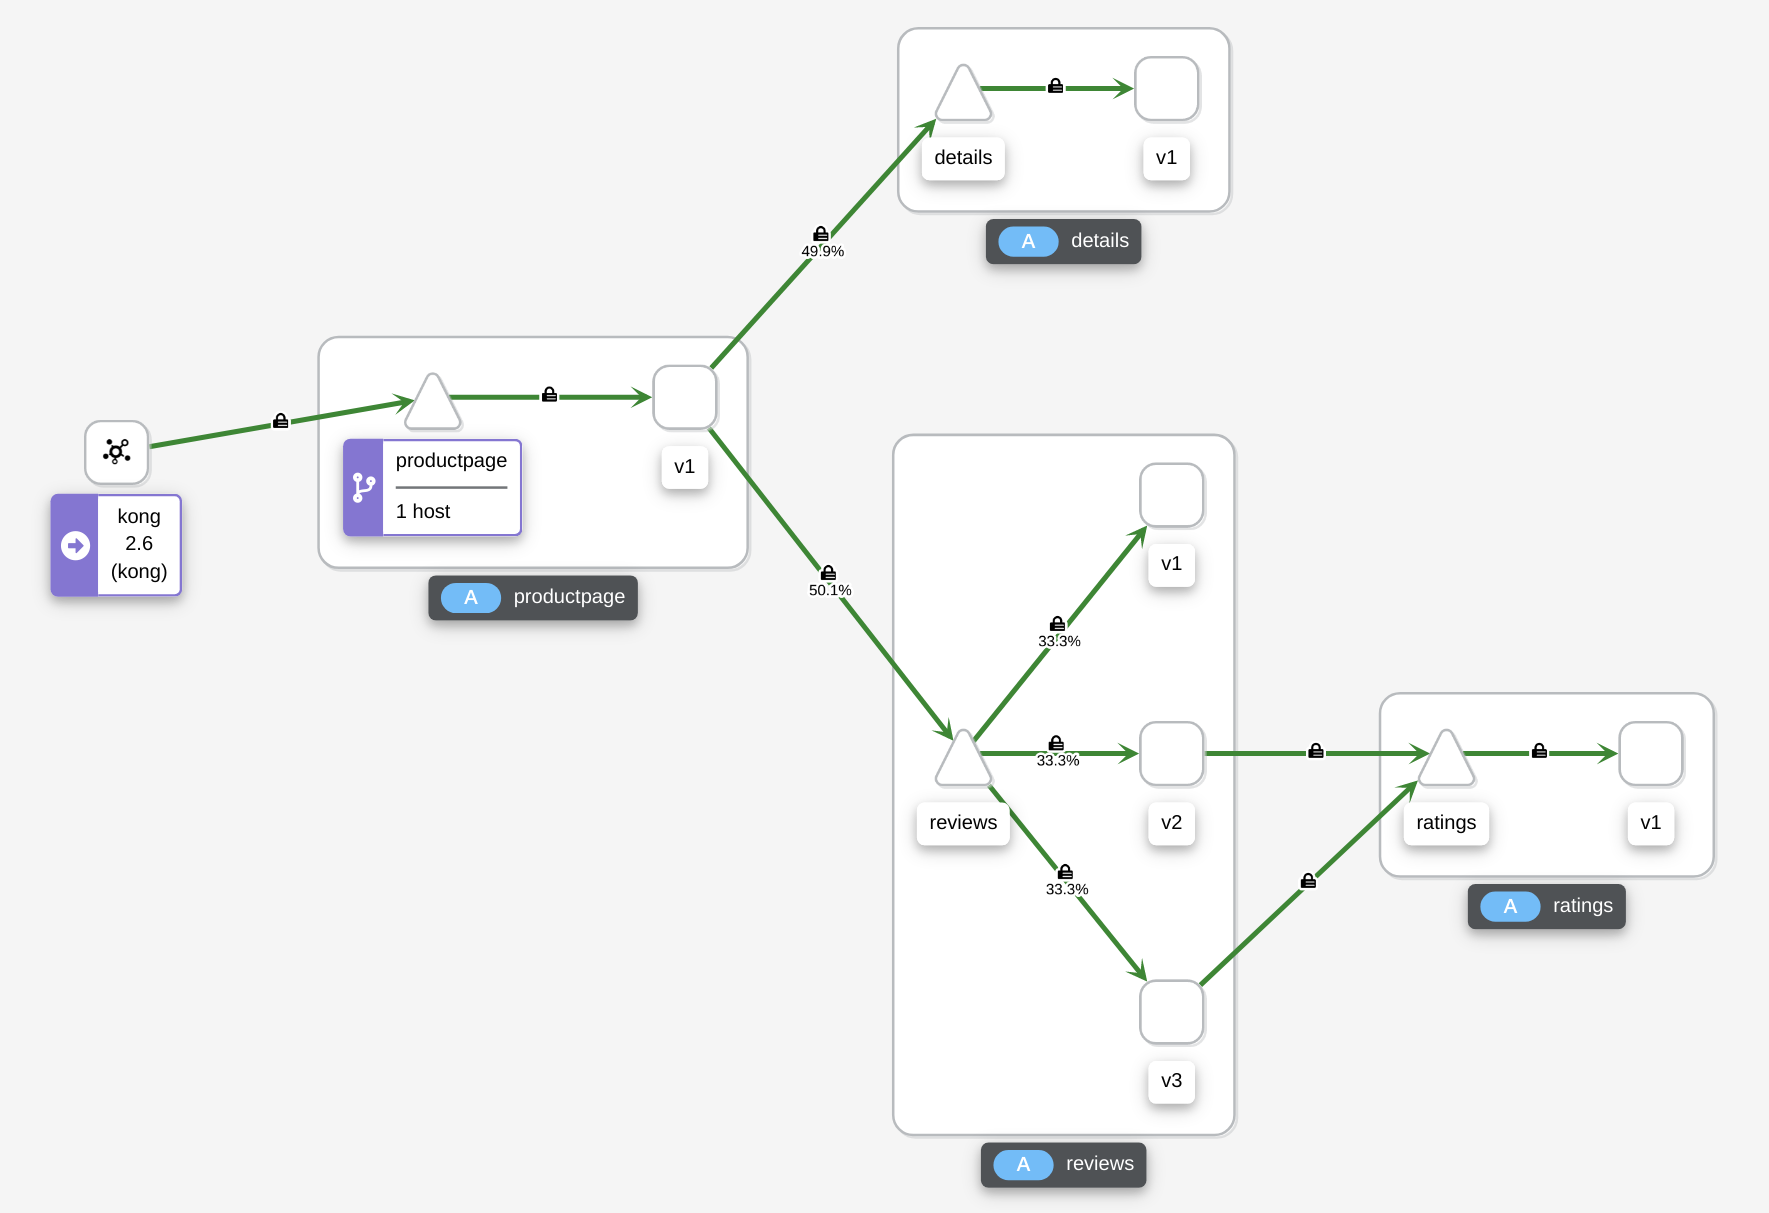
Then go to Kiali Dashboard -> Graph and then select Traffic Distribution under Display dropdown. Because the default load balancing algorithm is ROUND_ROBIN, we can see requests are almost equally distributed amoung 3 subsets.
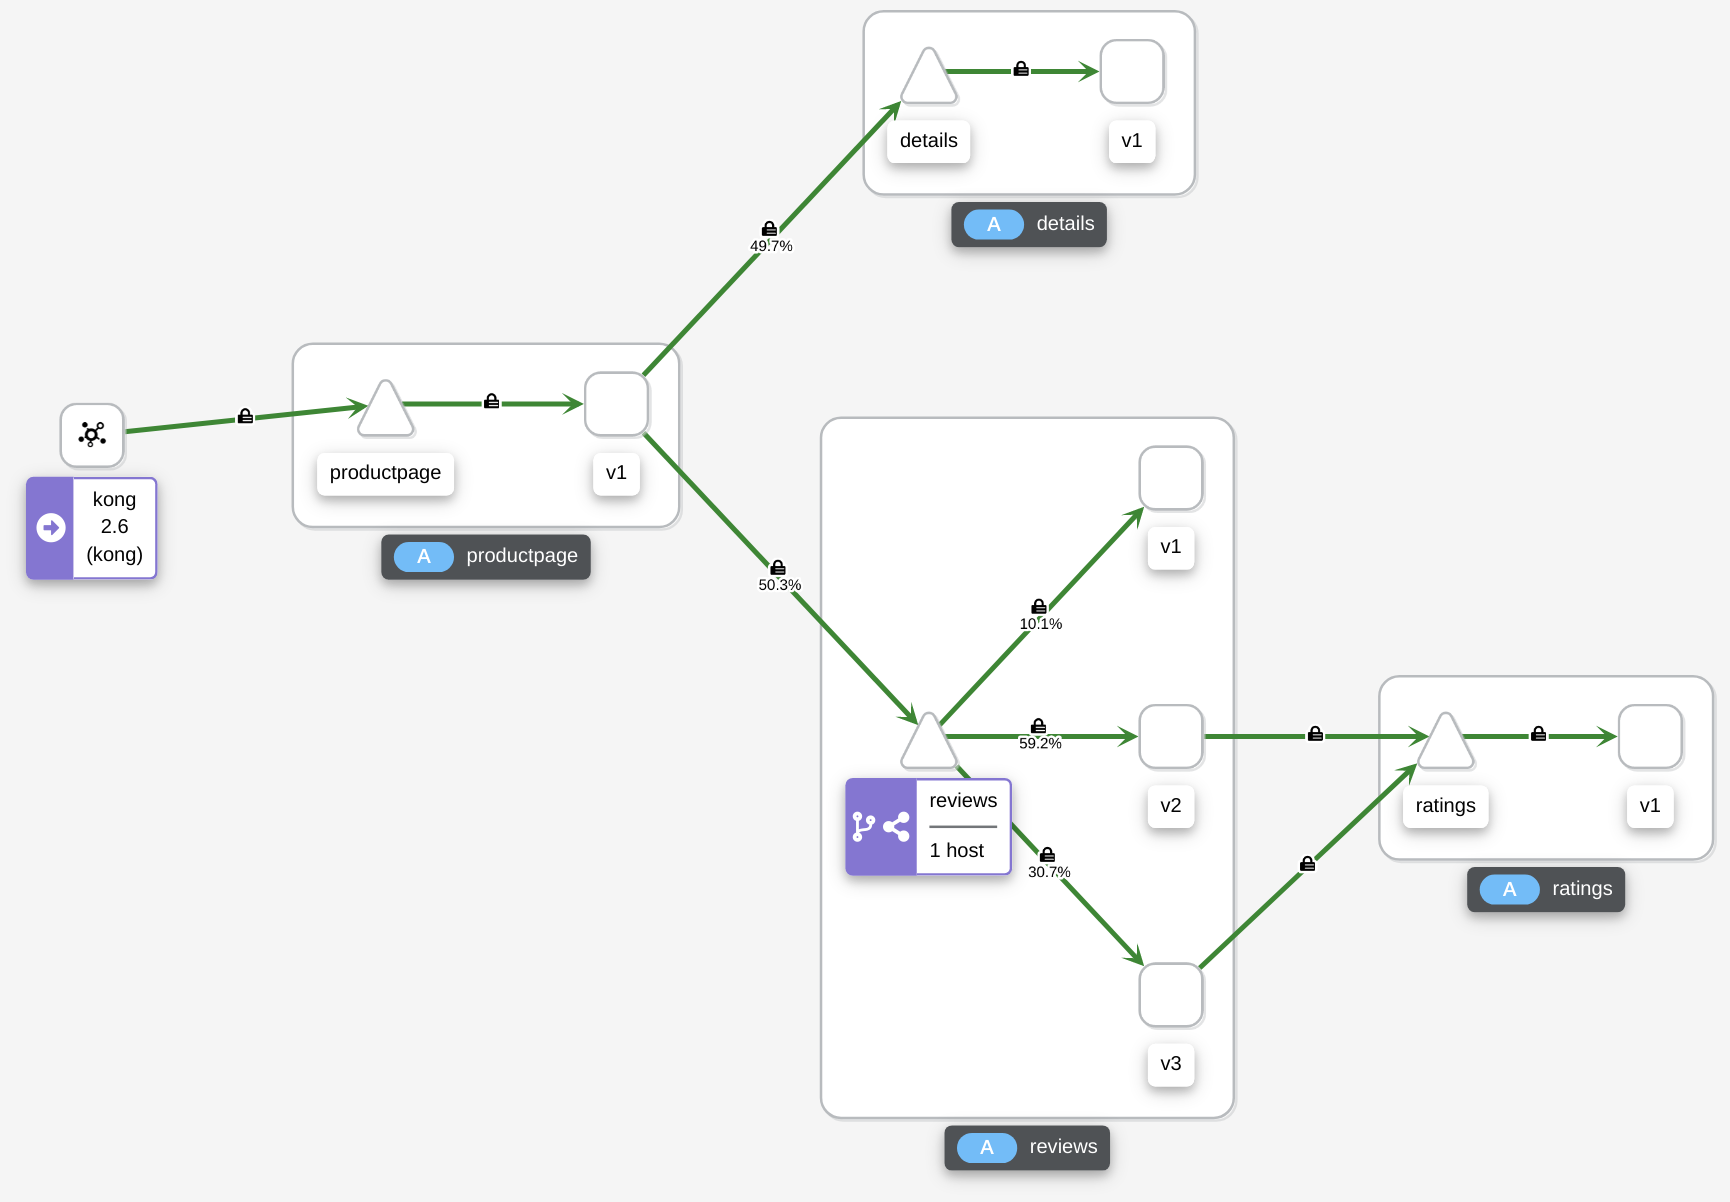
Let’s apply below VirtualService and DestinationRule. These two objects split the traffic to different review subsets based on its assigned weight. In the example I want 10% of traffic goes to v1, 60% goes to v2 and 30% goes to v3.
1 | kubectl apply -f - <<EOF |
After a while we should see the traffic distrubution changes.
That’s all I want to show you today. This is just the tip of the iceberg, istio have a ton of more features that you can explore.
Thank you for reading, see you next time.